 3DGenV
Cheat sheet
The following table summarizes the main software commands and how they can be triggered with the mouse and/or keyboard key combinations.
List of abbreviations used:
- MOV: Move the mouse while keeping the (left) button pressed
- SEL: Click in an object without moving the mouse
- SHIFT: Hold down the Shift key
- ALT: Hold down the Alt key
- CTRL: Hold down the Control key
- WHEEL: Spin the mouse wheel
- "X": Press the X key
| MOV |
Vertical - Rotation around the X axis Horizontal - Rotation around the Y axis |
ALT MOV | Rotation around the Z (or T) axis | "X" | Change the system of axes for rotations | ||
| MAJ MOV |
Right / Left - Move the camera right / left Up / Down - Move the camera up / down |
SHIFT WHEEL | Move the camera forward / backward | WHEEL | Increase / Decrease the focal length | ||
| "F" | Adjust the size of the tree to the screen size | SHIFT "F" | Make the 'fit to screen' Automatic / Manual | ||||
| "T" | Decrease the temporal extension of the tree | SHIFT "T" | Increase the temporal extension of the tree | ||||
| "H" | Decrease the horizontal extension of the tree | SHIFT "H" | Increase the horizontal extension of the tree | ||||
| "R" | Decrease the spheres radius or the images size | SHIFT "R" | Increase the spheres radius or the images size | ||||
| "S" | Decrease font size | SHIFT "S" | Increase font size | ||||
| "D" | Make Dates Appear / Disappear | "N" | Make Names Appear / Disappear | "G" | Make Generation number Appear / Disappear | ||
| "K" | Make SOSA number Appear / Disappear | "B" | Make Spheres Appear / Disappear | "I" | Make Images or Photos Appear / Disappear | ||
| "C" | Put the texts in Color / Black | "P" | Make the Control Panel appear / disappear | "L" | Make the List of individuals appear / disappear | ||
| SEL | Highlight the shortest branch towards the root of the tree | SHIFT SEL | Highlight the shortest branch between 2 individuals | ALT SEL | Visualize all the branches from an individual to the root of the tree (implex) | ||
| SEL MOV | Pull an object aside | SEL "A" | Align an individual on the line of sight towards the root | ||||
| SEL SHIFT MOV | Move an object | SEL ALT SHIFT MOV | Move a column | ||||
| SEL "M" | Mask / Unmask an individual | ALT "M" | Unmask all individuals | SHIFT "M" | Make masked individuals appear / disappear | ||
| CTRL "Z" | Undo last command | CTRL "Y" | Redo last undone command |
Basic handlings
Three-dimensional trees are structures in which each person is represented by a point in a three-axis coordinate system (X, Y, T). As in most 2D representations, the vertical (T) axis is time. People are positioned on this axis according to their date of birth. The algorithms of the generator calculate the two other coordinates by exploiting the data of filiation.
The software is composed of two modules: a generator and a viewer. It is organized around two axis systems. Each of these two axis systems is managed by one of the two modules.
The first axis system is linked to the tree itself and is shown in dotted green on the screen. It is managed entirely by the generator, which places all the people and unions in the tree there. All points are fixed in this system, on the other hand the whole system can turn in any direction but it turns rigidly.
The second system of axes is linked to the representation of the tree on the screen. It is fully managed by the viewer. It has the same origin as the first but, unlike the latter, this system is fixed and it is the coordinates of the points which evolve there.
The role of the viewer is to calculate, after each user action, the coordinates of all the points in this second system of axes then to project them onto the sensor of the camera as a function of the position of the latter and of its lens.
Rotations
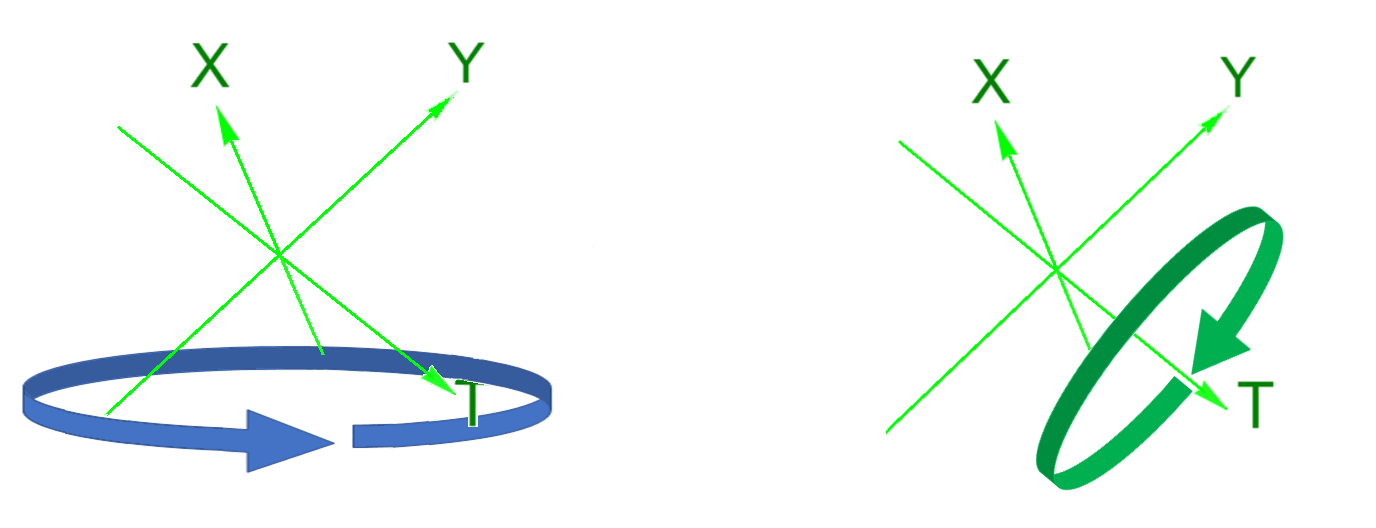
The rotations allow you to rotate the tree relative to the fixed axes (in blue) or relative to its own axes (in green). They are performed using the mouse by positioning its pointer in a free area of the screen and then moving it while keeping the left button pressed.
By default, the reference axes for the rotations are the fixed axes. These fixed axes, in blue in the illustrations below, are not displayed by the viewer. On the other hand, the axes specific to the tree (in green dotted lines) may or may not be displayed (see Settings below)
Moving the mouse vertically causes the tree to rotate along the fixed horizontal axis.
Moving the mouse horizontally causes the tree to rotate along the fixed vertical axis.
Rotation along the fixed axis perpendicular to the plane of the screen is obtained by holding down the « Alt » key.
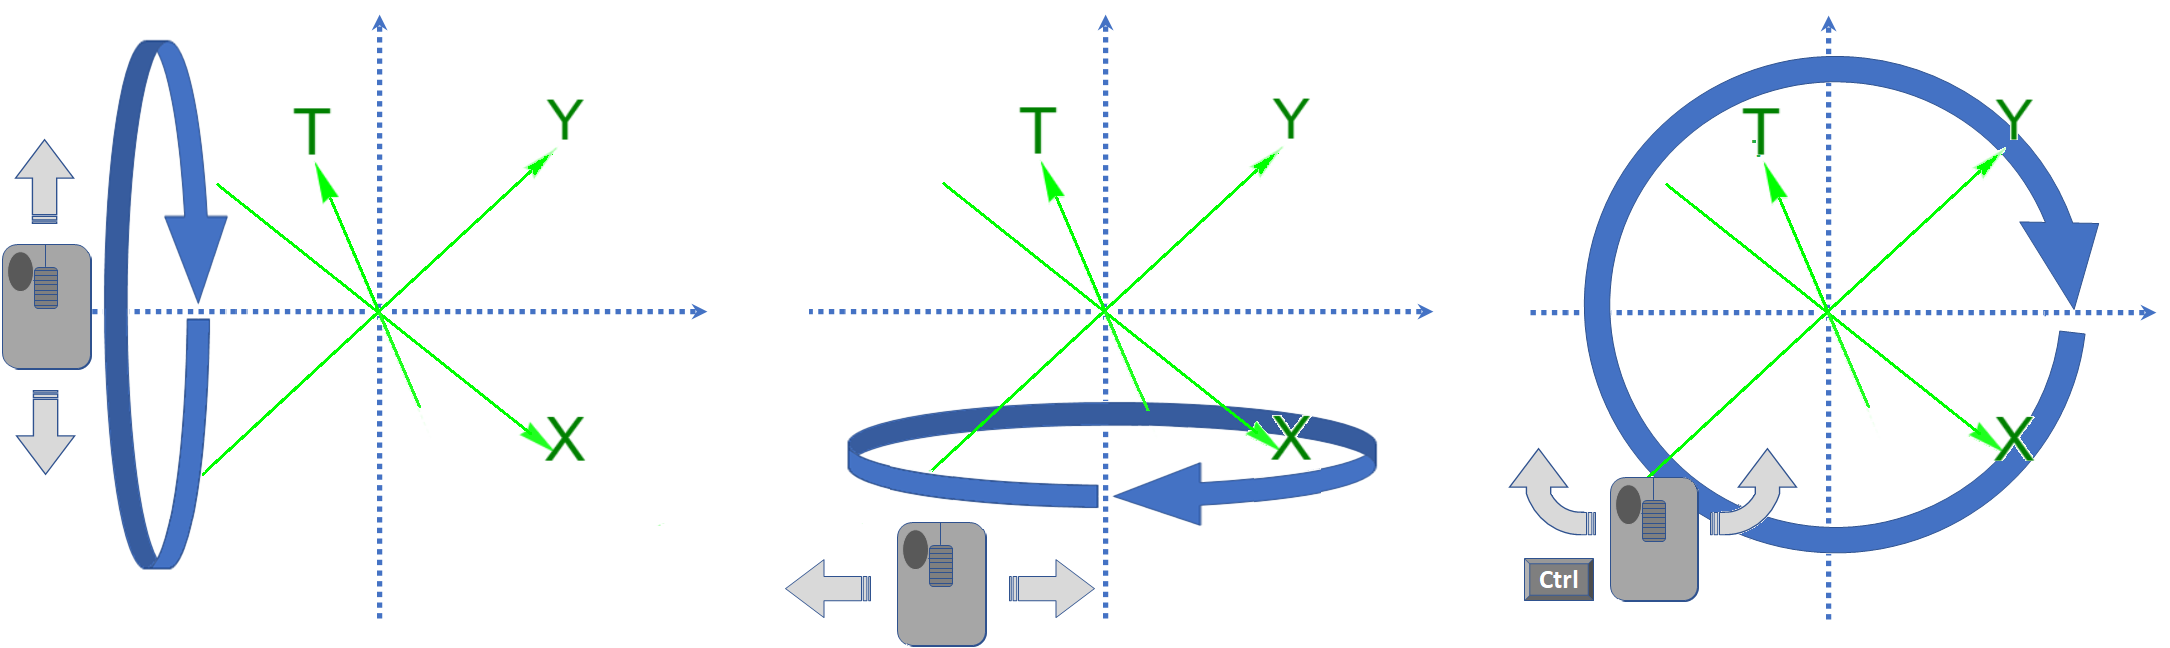
The reference axes for the rotations can be changed at any time by pressing the « X » key on the keyboard or using the control panel (see Control Panel below). A first press switches the reference axes to the axis system specific to the tree (in green). A new key press switches back to the fixed axis system.
Moving the mouse vertically causes the tree to rotate along its initially horizontal X axis.
Moving the mouse horizontally causes the tree to rotate along its Y axis, which is initially vertical.
The rotation along the time axis (T) is obtained by holding down the « Alt » key.
Translations
Translations are obtained by moving the camera relative to the fixed axis system. They are performed using the mouse by positioning its pointer in a free area of the screen and then moving it while holding the left button and the « Shift » key down.
Moving the mouse horizontally to the right causes the camera to move to the right. On the screen the tree moves to the left. Symmetrically, moving the mouse horizontally to the left causes the camera to move to the left. On the screen the tree moves to the right.
Likewise, moving the mouse vertically upwards causes the camera to move upwards. On the screen the tree moves downwards. Moving the mouse vertically downwards causes the camera to move downwards. On the screen the tree moves upwards.
The forward (resp. backward) movement of the camera is achieved by rolling the mouse wheel forward (resp. backward) while holding down the « Shift » key. On the screen, the tree grows (resp. shrinks).
Zoom
The lens of the camera through which the tree is viewed is a variable focal length. Its focal length can vary from 12mm (wide angle, 120° field) to 1200mm (telephoto, 2° field) and can widen or reduce the field covered by the camera. The default focal length is 52mm which corresponds to a 90° angle of view.
The focal length is controlled with the mouse wheel.
The focal length is reduced (zoom out) by rolling the mouse wheel backwards: the tree decreases on the screen.
The focal length is increased (zoom in) by rolling the wheel forward: the tree grows on the screen.
The effects of zooming and dollying seem quite similar. They differ, however, in that zooming out allows you to quickly locate a detail in the whole tree without changing your point of view, the camera does not move, while the forward dollying allows you to enter the interior of the tree, which is useful when it contains a large number of people.
Screen fit
Adjusting the size of thr tree to the size of the screen moves the camera in the 3 directions so that the tree fits entirely in the field of the camera given the focal length which remains unchanged.
This automatic adjustment can be obtained at any time by pressing the “F” key on the keyboard.
It can be made permanent by pressing the « SHIFT + F » keys on the keyboard. When the permanent automatic adjustment is requested, this repositioning is carried out each time the tree is rotated; mouse movements then control both tree rotations and camera movements. Manual camera movements and focal changes are neutralized.
Display
By default, after its generation, the tree is always presented in the classic way, that is to say with the time axis vertical on the screen. The oldest individuals are located at the top of the screen and the youngest at the bottom.
By default, all objects are represented by spheres: blue for men, red for women and gray for unions when they are present. Arrows connect the individuals between them from the ascendants towards the descendants or from unions towards the descendants.
The default values for sphere radius and character size are calculated for each tree based on the number of objects it contains. These values can be modified at any time (see Object size below)
Individuals can also be represented by photos or images (see Photos below). The dimension of the images can be modified in the same way as the radius of the spheres.
To make the tree easier to read, an artificial mist blurs the most distant individuals.
Each individual can be associated with his name and / or years of birth and death and / or his relative generation number and / or his SOSA number for ascendants. By default, only the name is displayed. The « Settings » menu allows you to choose the information to display.
The spheres can be bright, matt, or absent. In the latter case, only the selected texts are displayed. By default the spheres are bright. This can be modified to be adapted to the power of your web browser (see Settings below).
Hovering over an individual with the mouse pointer displays a title block recalling their first and last name,
their SOSA number in parentheses (for ascendants), their relative generation number (negative for ascendants and
positive for descendants) as well as their dates of birth and death.
Death dates, when missing, are not subject to estimation like birth dates.

When one of the two objects connected by an arrow passes behind the camera, the arrow may pass through the camera.
A small splinter materializes the place where this crossing takes place.
In the example below, the same as before but after rotation, between the two images the camera has advanced in the direction
of John of England. Aliénor d'Aquitaine went behind the camera.
The line that unites them is interrupted at the splinter.

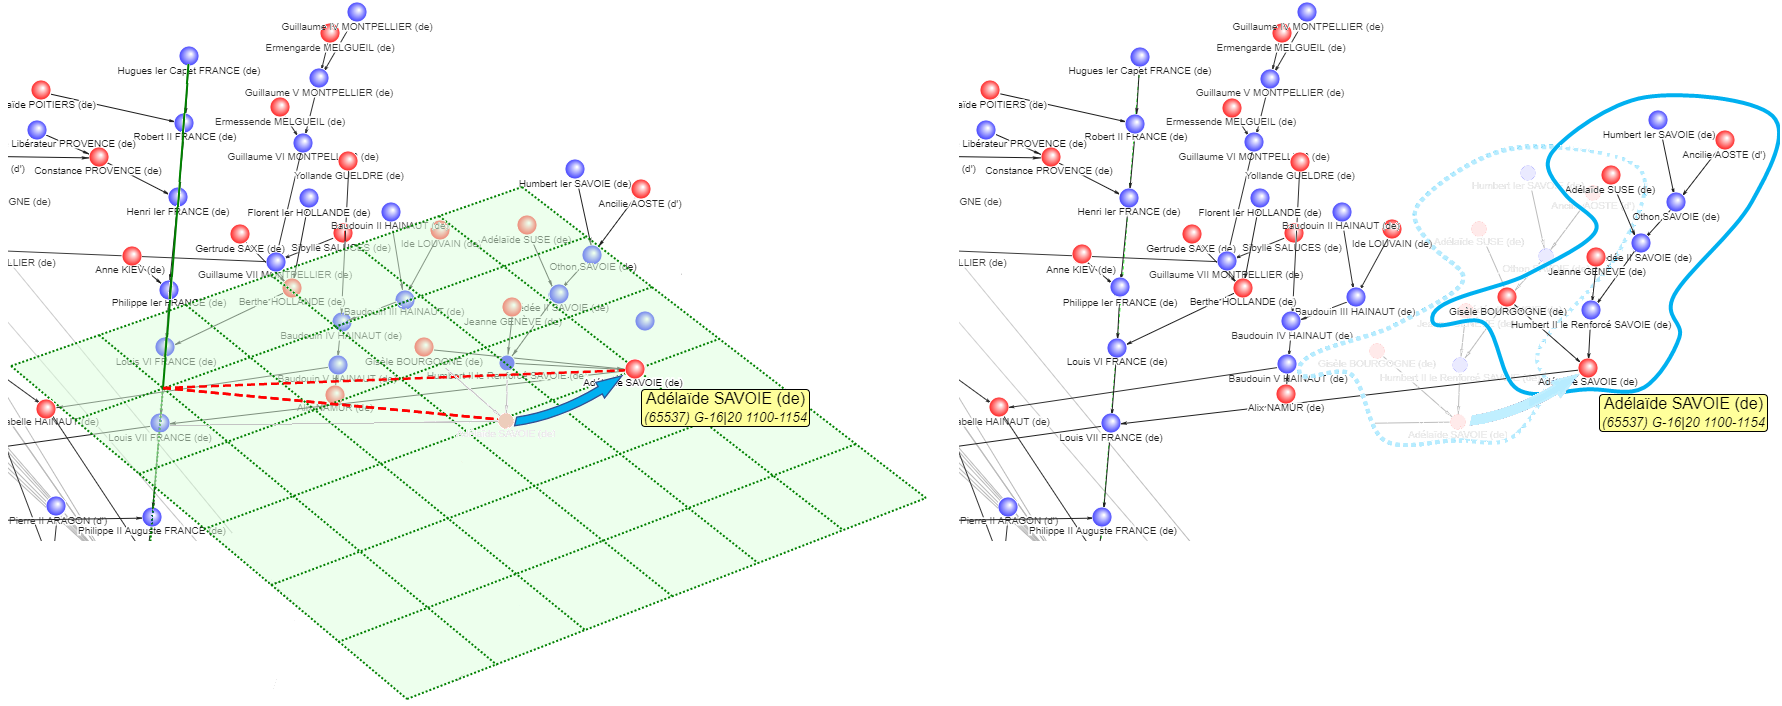
In a pure tree, the relative generation can be defined from the distance which separates any individual from the original individual.
However, because of the implexes, due to marriages between cousins however distant they may be,
the most general form of a family "tree" is what mathematicians call a directed acyclic graph
in which this distance depends on the path followed.
The same individual can thus have different generation numbers relative to another.
When there are several different generation numbers, the displayed text will show the minimum and maximum values
separated by a vertical bar.
For example, in the very simplified diagram below, there are 12 different ways to go from Louis VII to Henry IV.
The latter is therefore in the 13th generation by following the “official” branch, through the males,
but he is also in the 16th generation through Bonne de Valois.


Note : Spouses of descendants do not have a relative generation number unless they are descendants themselves (in case of pedigree collapse aka implex).
Reminder: a SOSA number or Kekulé number or ahnentafel (see Wikipedia) does not identify an individual but a family relationship. It is always relative to the individual who is at the root of the tree (of ancestry). The same individual can have different SOSA numbers in different trees. Regardless of the individual's origin, a given SOSA number always designates the same relationship to that individual and allows a person to be quickly located in the history of the individual. So, number 25 is always the "paternal grandmother of the maternal grandfather" of the original individual. In case of implex, the SOSA number is by convention the smallest of the possible numbers.
SOSA numbers quickly get high, they double with each generation. Thus, in the ancestry of the current King Philippe of Belgium, Hugues Capet, 30 generations above, would bear the number “1,115,684,864”.
The use of the conditional is imposed by the fact that, over such a long period, it is difficult to guarantee the accuracy and the completeness of the GEDCOM file originating the tree. A more complete file could give different values. This is the reason why we have chosen not to display these SOSA numbers beyond the 50th generation (SOSA < 2,251,799,813,685,248).
GEDCOM import
A standard format
GEDCOM is a standard file format allowing the exchange of genealogies between different pieces of software (cf. Wikipedia). Almost all genealogy pieces of software support this standard, and whichever one you use, you should have no problem exporting your work.
Important: Your GEDCOM file must be encoded in UTF-8 so that accented or special characters are correctly recognized. Most pieces of software allow this encoding but not all of them offer it by default. So check this point when exporting (it is often an option in the export command). If your software does not support UTF-8, you will be able to convert your file, after exporting it, with an open-access text editor (e.g. Notepad++).
Import
Importing a GEDCOM file can be done only once for a given file. The generation of a new tree can indeed be requested from any other tree previously generated and saved.
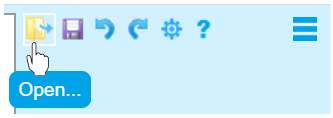
Pull down the main menu and click on 'Import ...'. The standard file selection window appears.
Navigate to the location where your file is located and select it.
By default, the '.ged' and '.gedcom' extensions are available.
You can change them ('All files' extension) at the bottom right of this window.

After validating your choice, the file will be read and checked.
Limits
The software can process large volumes of data. However, it has limits:
- The maximum size of GEDCOM files is limited to 100 Megabytes.
- The maximum number of individuals that a GEDCOM file can contain is limited to 100,000.
- The longest branches of ancestry or descent of an individual are limited to 127 generations (approximately 2,500 years upstream and downstream of the individual).
Control
A GEDCOM file can contain a wide variety of information, but only some of them are taken into account by the software: they are essentially those which identify individuals and establish filiations. It is on them that the controls are carried out.
If you have not modified the file exported from your favorite software, you should not encounter any problems during this control phase which then goes directly to the step of selecting the individual who will be the origin of the tree to be generated.
 However, a GEDCOM file is just a text file.
It can be edited or even entirely created using a text editor.
Hence, the need to verify its consistency by means of these checks.
However, a GEDCOM file is just a text file.
It can be edited or even entirely created using a text editor.
Hence, the need to verify its consistency by means of these checks.
Important: A chronological consistency of events is necessary in that it conditions the correct positioning of individuals
in the generated trees. At the time of import, an algorithm checks this consistency and alerts you to any date
incompatibilities. Most often, it will be errors in entering dates (ex: 1768 instead of 1758),
but it can sometimes be an error on the person (it is common to find homonyms on the same period in the same place).
Any anomalies on individuals or families are indicated with their identifiers, for example:
Incompatible dates between individual 'I437 - Mary Martin (1768)' and family 'F76' (difference of 18 years for 2 generation(s))
If your software does not provide access to these identifiers (they are often created on the fly at the export time), you can use a free GEDCOM editor, such as Ancestris, which will allow you to find all the objects, individuals and families, using their identifiers.
List of the main error messages:
- Line 'NNN' should be at level 0
- Individual 'XXX' cannot be child in more than 1 family
- Individual 'XXX' is both parent and child in family 'YYY'
- More than 2 parents in family 'XXX'
- Circular reference : Individual 'XXX' is its own ancestor
- Individual 'XXX' is defined more than once
- Individual 'XXX' quoted in family 'YYY' does not exist
- Individual 'XXX' quoted in family 'YYY' does not quote this family with the same role (Child or Spouse)
- Sexe of individual 'XXX' is invalid (should be 'M' ou 'F')
- Family 'XXX' is defined more than once
- Family 'XXX' quoted in individual 'YYY' does not exist
- Family 'XXX' quoted in individual 'YYY' does not quote this individual with the same role (Child or Spouse)
- Individual 'XXX' was born after is death
- Incompatible dates between individuals 'XXX' et 'YYY' (NN-year gap for GG generation(s))
- Incompatible dates between individual 'XXX' and family 'YYY' (NN-year gap for GG generation(s))
- Incompatible dates between families 'XXX' and 'YYY' (NN-year gap for GG generation(s))
Dates
Only dates from the Gregorian and French Republican calendars expressed in the standard GEDCOM format are recognized. The dates of other calendars or expressed in other formats (e.g. translated months) are ignored.
Phrased dates (e.g. DATE (Pentecost 2009)) are not recognized.
In presence of several birth dates (which can happen when there is a doubt), only the last declared is taken into account.
In the absence of birth date, the possible date of baptism is taken into account.
In the absence of dates of birth and baptism, the possible date of adoption is taken into account.
The year of birth is the most important of this calendar information as it is used to position individuals on the vertical axis. It must therefore have a value for all individuals. This is the reason why, during the control phase, an algorithm calculates an estimate for all missing or unrecognized birth dates. This algorithm uses filiation data and known dates to produce a realistic value and enable positioning.
When no estimate is possible (case of individuals or clusters of individuals without known dates), the year of birth is arbitrarily set at 2100.
Generate
The generation of a tree is automatically triggered at the end of the control phase when importing a GEDCOM file. It can also be triggered at any time from any other tree previously generated.
The generation window opens and then, immediately after, the parameterizing window opens too. This window displays the list of all the individuals present in the GEDCOM file. When generation is triggered from a previously generated tree (« Generate » menu), it is the content of the GEDCOM file from which this tree was itself generated.
General remarks
Any window with a title bar can be moved by clicking in the title bar then moving the mouse while keeping its left button pressed.
When a window is open, only that window is active. All those in the background are inhibited and tree manipulations are neutralized.

Sort order
By default, the list of individuals is sorted in ascending alphabetical order of last name then first name and finally by year of birth.
This sort order can be changed using the drop-down menu at the top left of the list.

The order of presentation of these 3 data (last name, first name, year) in the list reflects the sort order.

Note that the software's sorting algorithms do not differentiate between upper and lower case characters. They also group the characters carrying diacritics (accents, umlaut, cedilla, etc.) with the corresponding “bare” letter. Thus « Étienne » and « étienne » will be well together between « Ernest » and « eusèbe ».
Filter
The list can contain up to 100,000 individuals. When it is too large, the search for a particular individual can be tedious.
Alphabetical and numeric filters reduce the size of the list in order to facilitate this search.
Alphabetical filters always relate to the first of the criteria, last name or first name, appearing in the chosen sorting order.
Numeric filters always relate to the year regardless of the sort order.
The number of individuals filtered is shown at the right of the filter.
If no filter is defined, it is the total number of individuals present in the initial list.

Filter " begins with ... "
Enter one or more alphabetic characters in the filter box to restrict the list to individuals whose first name (or last name) begins with these characters.
Enter one or more numeric characters in the filter box to restrict the list to individuals whose year of birth begins with these numbers.
Filter " equal to ... "
By preceding the alphabetic characters with the sign ‘=’, the list is restricted to individuals whose first name (or last name) is strictly equal to these characters.
By preceding the numeric characters by the sign ‘=’, the list is restricted to individuals whose year of birth is strictly equal to these numbers. Note: The Gregorian year containing no more than 4 digits (at least until the year 9999) the filters ‘aaaa’ and ‘= aaaa’ are equivalent.
Filter " less than ... "
By preceding the alphabetic characters by the sign ‘<’, the list is restricted to individuals whose first name (or last name) is strictly less than these characters.
By preceding the numeric characters by the sign ‘<’, the list is restricted to individuals whose year of birth is strictly less than this number.
Filter " greater than ... "
By preceding the alphabetic characters with the sign ‘>’, the list is restricted to individuals whose first name (or last name) is greater than or equal to these characters.
By preceding the numeric characters by the sign ‘>’, the list is restricted to individuals whose year of birth is greater than or equal to this number.
Combination of filters
Up to 4 alphabetical or numerical filters can be combined.
When several filters are present, they restrict each other (logical operator AND).
Notes
When a filter is incomplete or several filters are inconsistent, the filter area appears in red (e.g. < 15 > 16 ).
Names can contain spaces (e.g. "de La Fontaine"). First names can be compound (e.g. Jean-Pierre) or multiples (e.g. Jean Pierre), the first name field, which in fact contains all the first names, can therefore also contain spaces. The character ‘_’ (underscore) is used as a space substitute in alphabetical filters (e.g. ‘de_La_Fontaine’)
Examples
Liste is sorted by Year / FirstName / LastName
| Filter | List |
|---|---|
| jean | All the 'Jean', 'Jeanne', 'Jean-Pierre', etc. |
| =jean | Only the 'Jean' having one single first name |
| jean_ | Only the 'Jean' having several first names |
| <jean | 'Alain', 'Bernard', …, 'Jacques' |
| >jean | 'Jean', 'Jeanne', …, 'Kevin', 'Louis', …, 'Zoé' |
| =jean-pierre | All those whose first name is strictly 'Jean-Pierre' |
| jean-pierre_ | All those whose first first name is 'Jean-Pierre' |
| jean_pierre | All those whose first first name is 'Jean' and the second first name starts with ' Pierre' |
| =jean_pierre | All those having 'Jean' and 'Pierre' as only 2 first names |
| 16 | All those born in 16 plus those born between 160 and 169 plus those born between 1600 and 1699 |
| >1600 <1700 | All those born in the 17th century |
| 1638 | All those born in 1638. Equivalent to =1638 |
| jean >2000 | All the 'Jean', 'Jeanne', 'Jean-Pierre', etc. born in the 21st century |
Selection
By selecting an individual (click on the left button), information relating to this individual appears at the
bottom of the list: dates and places of birth and death (when they are known), numbers of ascendants and / or descendants,
numbers of generations, etc.
This information varies according to the choices of tree types made in the right part of the window.

Generations
For all trees, ancestry or descent, it is possible to limit the number of generations to be taken into account by
checking the box « over … gen. » and then by setting this number using the spin button.
In the absence of any specification, the maximum number of generations is taken into account.

With unions. With spouses
By default, the tree contains only individuals. They are connected by arrows classically oriented from ascendants to descendants. It is, however, possible to include unions.
For ascendants, this is obtained by checking the box « With unions ».
For descendants, the « With spouses » checkbox allows you to show the spouses, possibly multiple, of the individual from which the tree originates and of his descendants and therefore also the corresponding unions.
The presence of unions in the graph gives, as for individuals, access to their date by hovering over the mouse pointer.
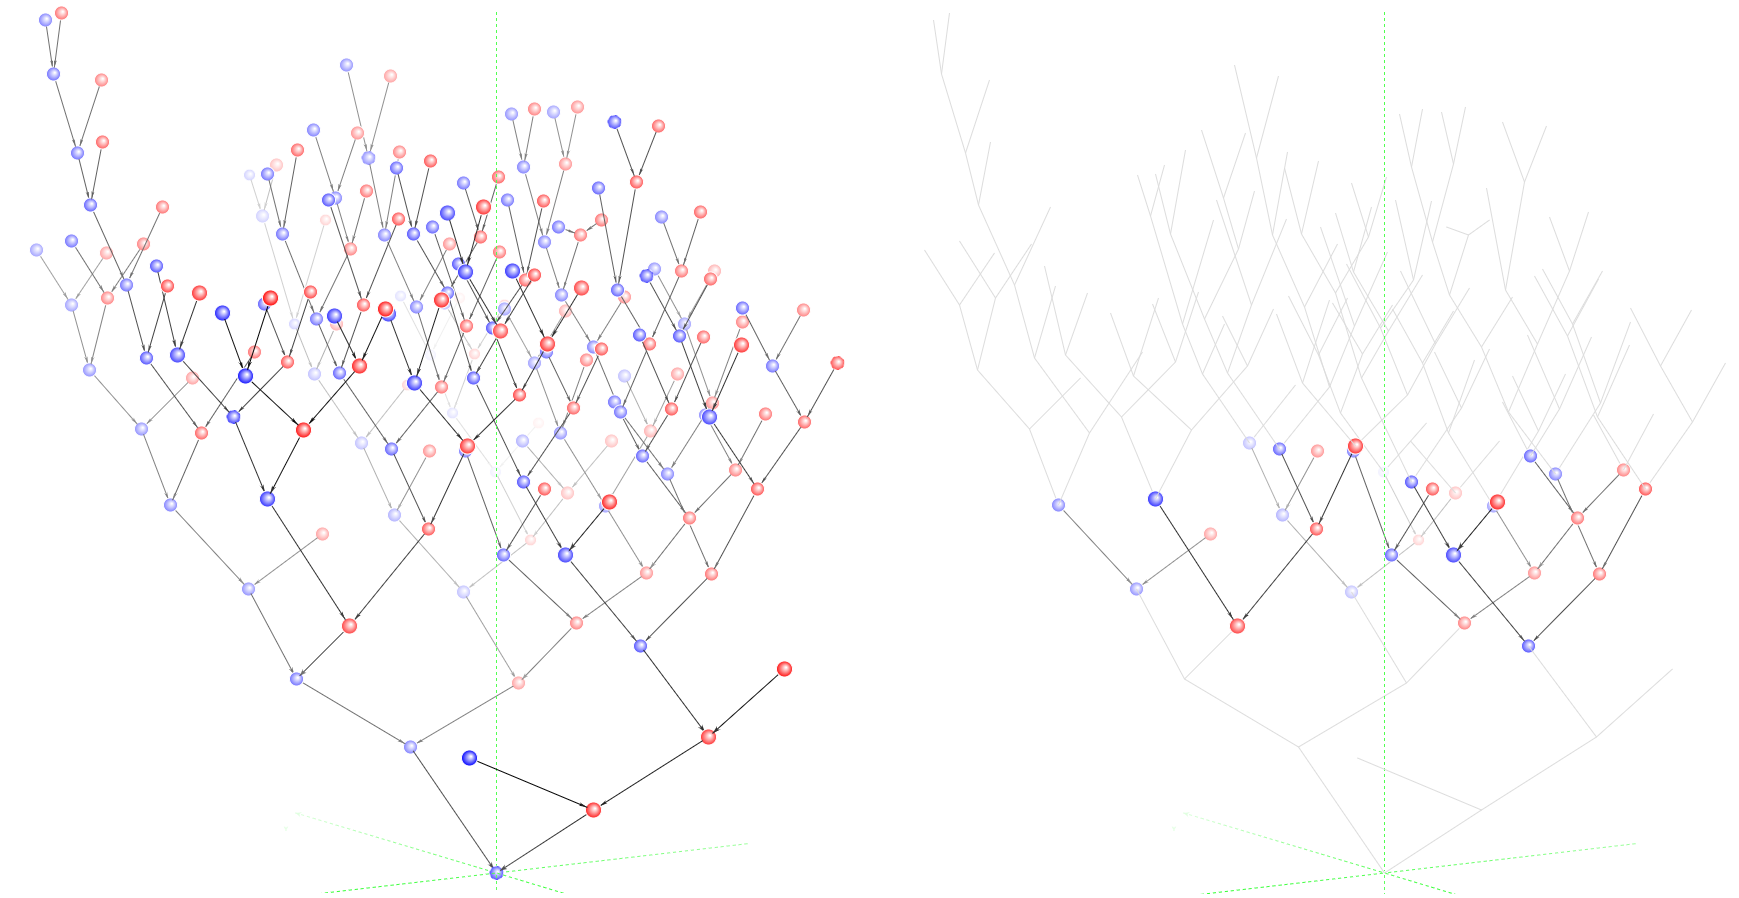
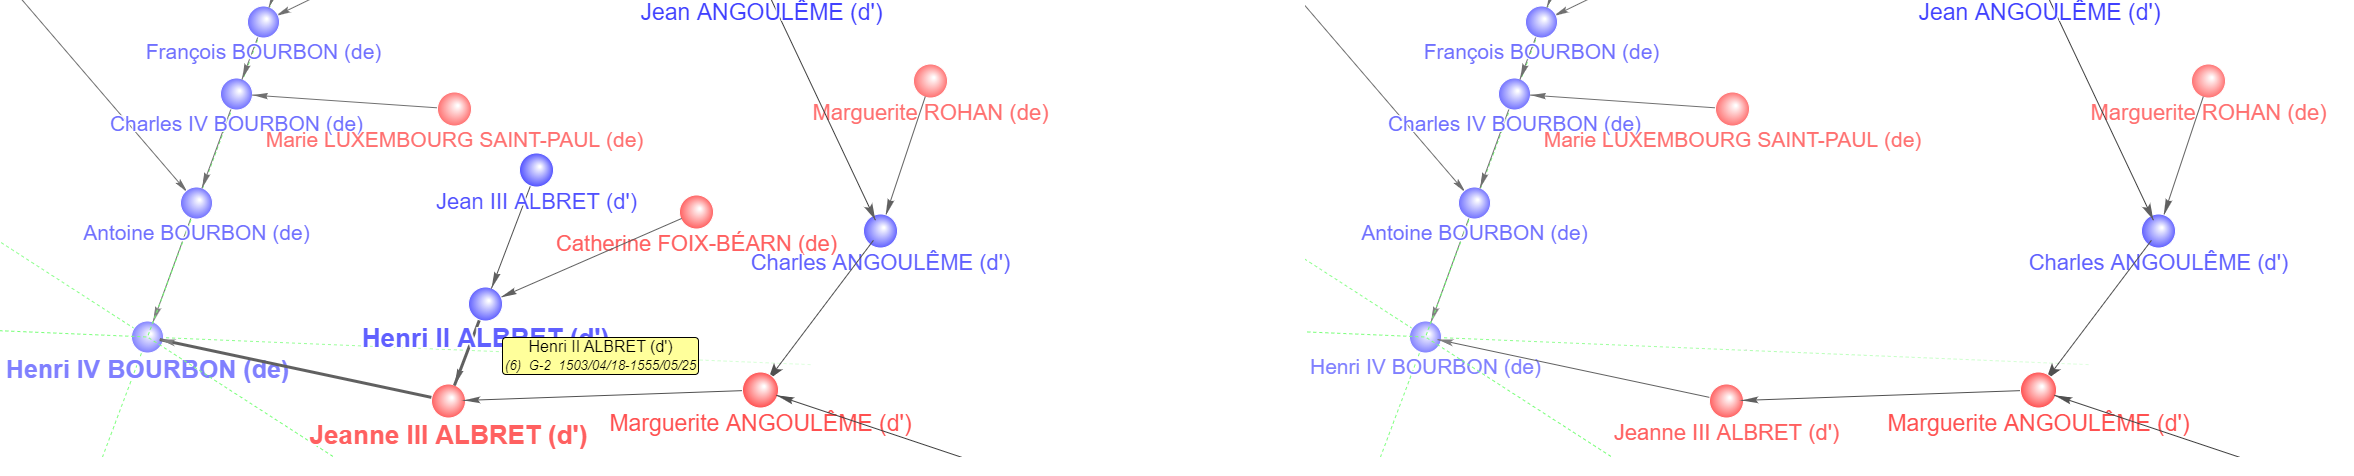
The 2 figures below represent the same ancestry tree without unions, on the left, and with unions (on the right).

The 2 following figures represent the same descent tree without the spouses, on the left, and with the spouses (on the right).

Note: the presence of unions in the tree, and a fortiori of the spouses of descendants, significantly increases the number of objects to recalculate for each manipulation and can penalize the fluidity of movements in the case of trees extended over many generations or on low power computers.
Family
The « Family » option allows you to expand an individual's ancestry and descent tree to include siblings and their descendants. It is, in a way, the family tree of the couple of parents or that of the siblings of which all the members constitute generation 0 (G0). The « Family » option is only available for individuals with both parents and at least one sibling.
In this type of tree, the union of the couple replaces the individual at the origin of the system of axes.

Generating
Call to generator
Once the options have been set, the generation is triggered by pressing the « Ok » button. The settings window closes and the generation window summarizes the choices made as well as the current generation number and the number allocated by the subscription.
Return from Generator
Once the tree has been built on the server, you will be offered to download it to your computer.
This is the standard download procedure as you usually do.
Depending on the browser you are using and its settings (download option), the file will automatically be placed in the « Downloads » directory or you will be able to choose another location.
In both case, once the download is complete, you can move or copy the file elsewhere: external disk, USB key, cloud, etc. You will preferably place it in a directory included in your daily backup procedure.
Reminder: regular backup on a disconnectable medium is the first recommendation regarding cybersecurity.

The default name of the file is formed from the original individual or family of the tree:
LASTNAME FIRSTNAMES (YEAR). Aga[U]Dgd[S]
or
HUSBAND_LASTNAME - WIFE_LASTNAME (YEAR). Aga[U]Dgd[S]
The suffix Aga[U]Dgd[S] is a code summarizing the characteristics of the tree. In this code ga is the number of ascending generations and gd the number of descending generations. The letters U and S indicate respectively the Unions and Spouses options when they have been selected.
Once the file has downloaded, click the « Display » button to view it. A rotation (-π / 2) is automatically performed so that the tree appears in the traditional way, that is to say with ascendants at the top of the screen and descendants at the bottom.
Limits
The number of objects that can be comfortably handled in a tree depends on the power of the computer and the size of the screen.
With an entry-level computer and a 13" screen, a few hundred people is a maximum to maintain readability and fluidity.
With a powerful computer and a 32" 4K screen, it is possible to go far beyond a thousand people.
In all cases, it is recommended to limit the number of generations to be taken into account for your first trees in order to gradually familiarize yourself with the topology of your family.
Reminders : The presence of unions in the tree significantly increases the number of objects to calculate. The permanent automatic adjustment on the screen (SHIFT + F) requires also more calculations and can penalize the fluidity of movements on low power computers.
Save
If you have created viewpoints or modified the position of one or more individuals in the tree (see Moving objects below), you can save these modifications.
The « Save » menu triggers a procedure similar to that of downloading. As in this one, and depending on the download option chosen in your browser, the file will automatically be placed in the « Downloads » directory or you will be able to choose another location.
The default name remains unchanged. In the event of a duplicate, most browsers suffix this name with a counter placed in parentheses when they are in automatic mode in the « Downloads » directory. If you left the file there during generation, which is not recommended, its original version will be kept.
Saving again a tree does not increment the generation counter. Your balance therefore remains unchanged.
Open
The « Open » menu allows you to view a tree previously saved either after generation or later after modifications.
The window that opens is your browser's standard file opening window; this is the same as for the import
except that the extension proposed by default is « .3DGenV ».

The viewer can only display one tree. The selected tree replaces the one present in the viewer. On the other hand, it is possible to launch several viewers in different tabs of the browser. Each one can then display a different tree.
The « Print » menu allows you to build a JPEG image of the tree
in its current state with the possible highlighting of branches
(see below Highlight a branch)
or the possible restriction to a given period (see below Control Panel)
or the possibe masking of individuals (see below Mask individuals).

The « Quality » parameter artificially increase the size of the image to take into account the fact that printers have a better resolution than screens..
- Draft: the image is small and generated quickly, but rendering on the printer will be poor.
- Standard: this is the default value for a conventional printer (e.g. 300dpi in A4 format).
- High: for printing in large format (> A4) or on photographic paper. The image is larger and takes longer to generate.
The « Output » parameter indicates to which medium the generated image must be transferred:
- Printer: a new tab will open with the image for only content and your browser's standard print command (usually CTRL + P) will be automatically triggered.
- Photo: your browser's standard download command will be triggered for the image. The default name is the same as the tree name.
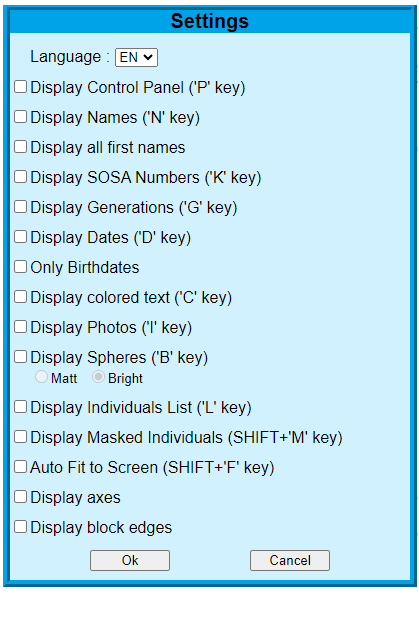
Settings
The « Settings » menu allows you to set display parameters.
The display options chosen are stored in a cookie. If you have not accepted the use of cookies, your choices cannot be remembered and you will have to redefine them at each session.
Some display settings can also be set using the keyboard.
The selected language only concerns the software itself (menus, messages, etc.) and not the genealogy data. The default language is that of your browser.
The control panel (see Control Panel) below) allows precise adjustment of the angles of rotation around the 3 fixed axes or the 3 own axes, the position of the camera and its focal length. It also manages viewpoints and display periods. The control panel can also be displayed by pressing the « P » key on the keyboard. When the panel is displayed, pressing the « P » key again makes it disappear.
By default only first and last names are displayed. It is possible to add or substitute the SOSA number for ascendants and, for all, the year of the birth and death dates as well as the relative generation number, positive for descendants and negative for ascendants. These possibilities can also be toggled with specific keys on the keyboard: pressing once displays the element, pressing again makes it disappear.
- « N » key for first and last names
- « D » key for dates
- « K » key for SOSA numbers
- « G » key for relative generation numbers.
By default all first names of an individual are displayed. Unchecking the « Display all first names » option, restricts the display in the tree to only the first name, possibly composed. This option has no effect on the lists which systematically display all first names.
By default, the texts (first names, last name, dates, SOSA number and relative generation number) are displayed in black. They can be displayed in the same color as the associated individual (blue or red). The « C » key controls this toggle.
Individuals can be represented by their photos. In the case of a very dense tree, these photos can be removed to free up space. The chosen texts then take their places. The option to display or not the photos can also be obtained by pressing the « I » key on the keyboard which, like the others, works in a toggling way.
By default, objects are represented by bright spheres. In the case of a very dense tree, they can be removed to free up space. The chosen texts then take their places. The option to display or not the spheres can also be obtained by pressing the « B » key on the keyboard which, like the others, works in a toggling way.
Shiny bright spheres accentuates the impression of relief. However, it requires a lot of calculations and can penalize the fluidity of movements on low-power computers or with some browsers (e.g. Firefox). If you are in this case, fall back on the « matt spheres » option or suppress their display.
The « L » key controls the display of the list of individuals present in the tree (see List individuals below). Like the other commands, it's a toggle: pressing the key displays the list, pressing again makes it disappear.
The « SHIFT + M » keys control the display of hidden individuals (see below, Masking individuals). It also works in toggling mode: pressing the key causes the masked individuals to appear, pressing again removes them.
The « SHIFT + F » keys govern the permanent automatic adjustment of the camera position. Reminder: adjustment to the size of the screen, « F » key, allows you to move the camera in the 3 directions so that the tree fits entirely in the field of the camera, taking into account the focal length that remains unchanged. When the permanent automatic adjustment is requested, this repositioning is carried out with each rotation of the tree; mouse movements then control both tree rotations and camera movements. Independent camera movements and focal changes are neutralized.
Finally, the last two options allow to control:
- on the one hand, the display of the axes specific to the tree (in green dotted lines). By default, these axes are displayed.
- and on the other hand, the display of the edges of the block surrounding the tree. This option allows you to make a first idea of the volume that the tree would occupy once engraved.
Control Panel
The control panel allows you to precisely adjust the angles of rotation around the 3 fixed or own axes, the position of the camera and the focal length. It also makes it possible to manage viewpoints and the display period. It also features icons of the most commonly used menus.
The control panel is activated by pressing the « P » key on the keyboard. A new press makes it disappear. It can also be activated in the « Settings » window (see Settings above). It appears on the right side of the screen.
Menu reminder icons
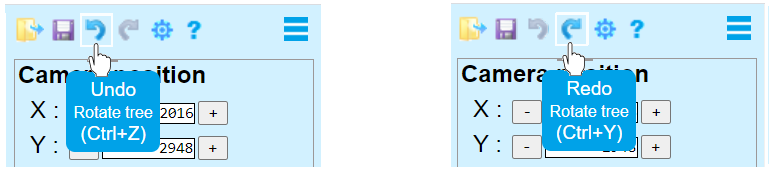
The top banner of the control panel offers a series of icons of some the functions of the main menu (« Open », « Save as », « Settings », « Help ») as well as the « Undo » and « Redo » commands. The function of each of these icons is recalled by hovering over it with the mouse pointer.
Camera position and lens focal
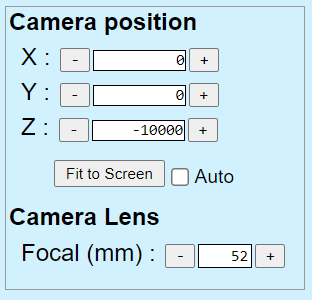
The coordinates of the camera along the 3 fixed axes as well as the focal length of its lens are each controlled by a group of 3 commands: two buttons allowing to decrement, « - », or to increment, « + », the value of the element and which surround a field allowing to freely set this value.
The value of the increment depends on the element considered:
- 1‰ of the Z coordinate for the X and Y coordinates.
- 1% of its value for the Z coordinate.
- 5% of its value for the focal length.
Keeping the button pressed, the increment is repeated until the button is released. The translational movement is then continuous.
There are no limits to the movements of the camera.
The focal length can only vary from 12mm (wide angle, 120° field) to 1200mm (telephoto, 2° field). The default focal length is 52mm which corresponds to a 90° angle of view for a "full frame" camera (24x36).
The « Fit to screen » button (equivalent to pressing the « F » key) allows the camera to be moved in the 3 directions so that the tree fits entirely in the field of the camera taking into account the focal length which remains unchanged.
Only visible individuals are taken into account in calculating the position of the camera. Hidden individuals are ignored unless the « Display Masked Objects » option is enabled.
The « Auto » checkbox (equivalent to pressing the « SHIFT » and « F » keys simultaneously) makes this automatic adjustment permanent. Repositioning is then carried out with each rotation of the tree. Mouse movements thus control both tree rotations and camera translations. In this configuration, the coordinates and focal control groups are neutralized but the automatically calculated values are still displayed.
Tree Rotations
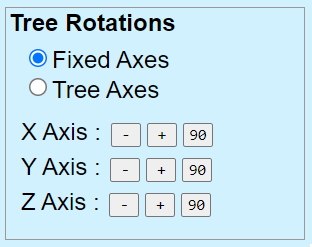
The reference axis system for the rotations is chosen using the two radio buttons. The rotations are performed in the fixed axes or in the axes specific to the tree, shown in green on the screen (see above Basic handlings).
This choice can also be made using the « X » key on the keyboard. A first press switches from the fixed axis system to the tree-specific axis system, a new press switches back to the fixed axis system.
By default, the reference system is that of the fixed axes.
Around each of the X, Y or Z axes of the chosen system, the rotation is controlled by a group of 3 buttons allowing, for the first 2, to decrement, « - », or to increment, « + » by 1° the angle along this axis and, for the third, « 90 », to increment this same angle by 90°.
Keeping the button pressed, repeats the increment until the button is released. The rotation is then continuous.
Tree angles
The values displayed always correspond to the angles of the 3 minimum rotations performed successively in the fixed system of reference around the X axis, then around the Y axis and finally the Z axis and which are necessary and sufficient to bring the tree in its current configuration from an initial state {0, 0, 0}.
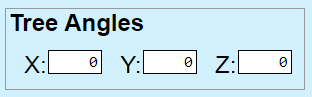
These values can be set freely (subject to being comfortable with the geometry in space to anticipate the result!).
The angles displayed seem to evolve erratically. This is because rotations in space are noncommutative operations. Their result depends on their number, their value, and the order in which they were performed. The values indicated summarize and synthesize the multiple rotations actually performed in any order around any axes of any reference system.
Note: there are in fact 2 equivalent triplets of minimum rotations. If {α, β, γ} is one of them then {π+α, π-β, π+γ} is the other.
Viewpoints
Viewpoints allow you to memorize interesting tree configurations on the screen so that you can quickly display them again.
A viewpoint keeps the coordinates of the camera, its focal length, the angles of the 3 minimum rotations of the tree, the masked individuals, the period considered, the temporal and horizontal extension coefficients as well as the radius of the spheres, the size of images and the font size. All these defining the screen configuration at the time it was saved.
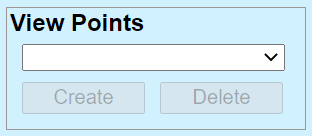
Each viewpoint has a name.
To create a viewpoint, enter a name in the edit box and press the « create » button.
To display a viewpoint, scroll down the list by pressing the inverted black triangle to the right of the edit field and select the desired one.
The name of the last selected viewpoint remains in the editing area even if you perform translations or rotations, which allows you to modify it by pressing the corresponding button. To redisplay its saved configuration, reselect it.

To delete a viewpoint, press the corresponding button.
An « Initial » viewpoint is automatically created at generation time , it corresponds to the state displayed upon return from the generation.
Period
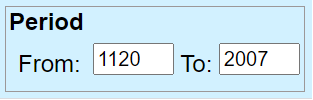
By default, the displayed period corresponds to the number of generations requested for ascendants and descendants during the generation. It spans from the oldest birth date to the most recent.
It is possible to restrict the displayed period by modifying the indicated values. Only objects whose year of birth is within this period, limits included, are visible.
In order to better situate the period displayed in the whole tree, the skeleton of the tree remains visible in watermark.
The restriction to a period does not modify the tree and does not intervene in the automatic adjustment. On the other hand, it is taken into account in the viewpoints.
If the specified dates are incompatible (start date greater than end date) or outside the maximum amplitude, this anomaly is indicated in red.
Removing a limit or setting it to 0 resets it to its default value.
When the list of individuals is active (see List individuals) below), a date filter is automatically generated in order to keep it consistent with the individuals displayed. This filter cancels and replaces any previous filter. Changing the filter does not change the displayed period.

Examples
Pull down the main menu and click on « Examples... », the following window appears:
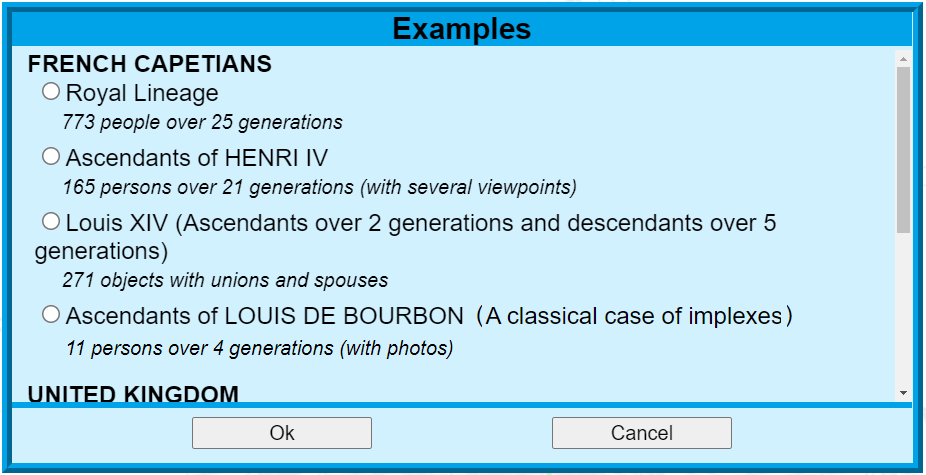
Select an example by clicking in the corresponding radio button and pressing the « Ok » button. The chosen tree is loaded and displayed on the screen.
Note: all of these examples refer to european royal families whose history is public. However, this is not a historian's work. They are there for illustration only and make no claim to completeness or even accuracy.
Spatial extensions
You can view the trees you have generated from any computer, especially if you have saved them in the cloud. These computers can have screens of different sizes, different resolutions and different formats: 4/3, 16/9, etc. The values of the coordinates of the objects are calculated by the generator regardless of the size and format of the screens on which the tree will be displayed. They are calculated a priori to form a volume as compact as possible. It may therefore be necessary to adapt them a posteriori to take into account the screen on which the tree is actually displayed. This is the reason for spatial extensions: vertical or temporal and horizontal.
Temporal extension
The vertical or temporal extension commands contract or expand the tree along the time axis. They are obtained using the « T » and « SHIFT+T » keys on the keyboard.
- By pressing the « T » key on the keyboard, you contract the timescale by 10%.
- By simultaneously pressing the « SHIFT » and « T » keys on the keyboard, you expand the timescale by 11%.
Horizontal extension
The horizontal extension commands contract or expand the tree in horizontal planes, the planes perpendicular to the time axis. They are obtained using the « H » and « SHIFT+H » keys on the keyboard.
- By pressing the « H » key on the keyboard, you contract the scale of the horizontal planes by 10%.
- By simultaneously pressing the « SHIFT » and « H » keys on the keyboard, you expand the scale of the horizontal planes by 11%.
Remarks
These commands can be repeated in either direction as many times as you like. However, too many successive contractions can distort the tree around the origin (coordinate values are expressed in integers). If you notice such distortion, cancel the last contractions (« CTRL+Z »).
The extension coefficients are stored in the viewpoints and saved with them.
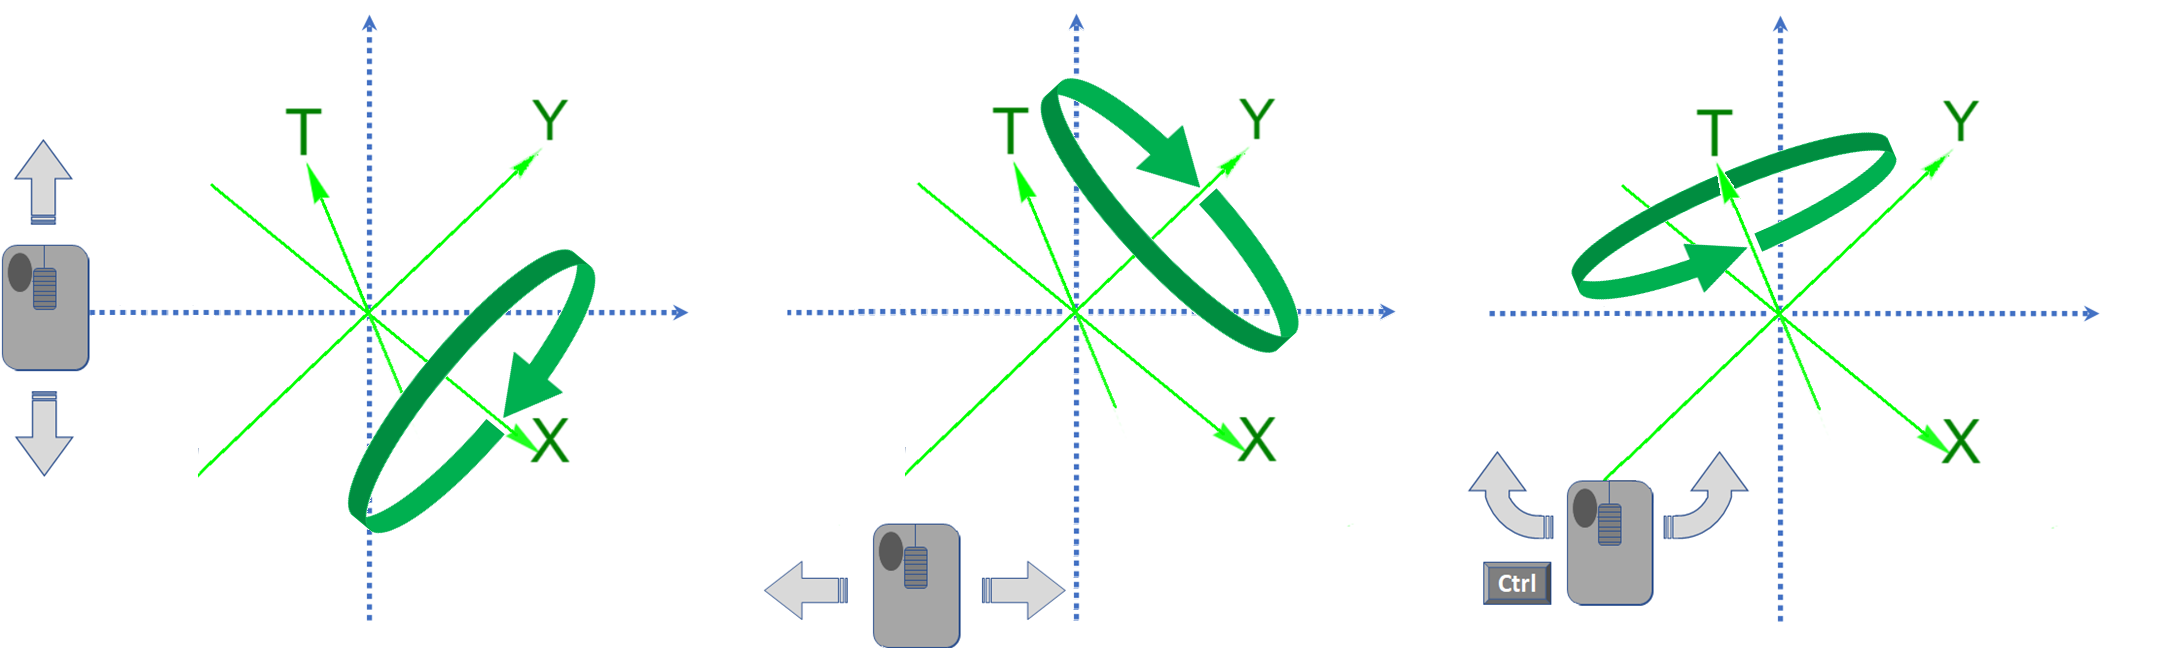
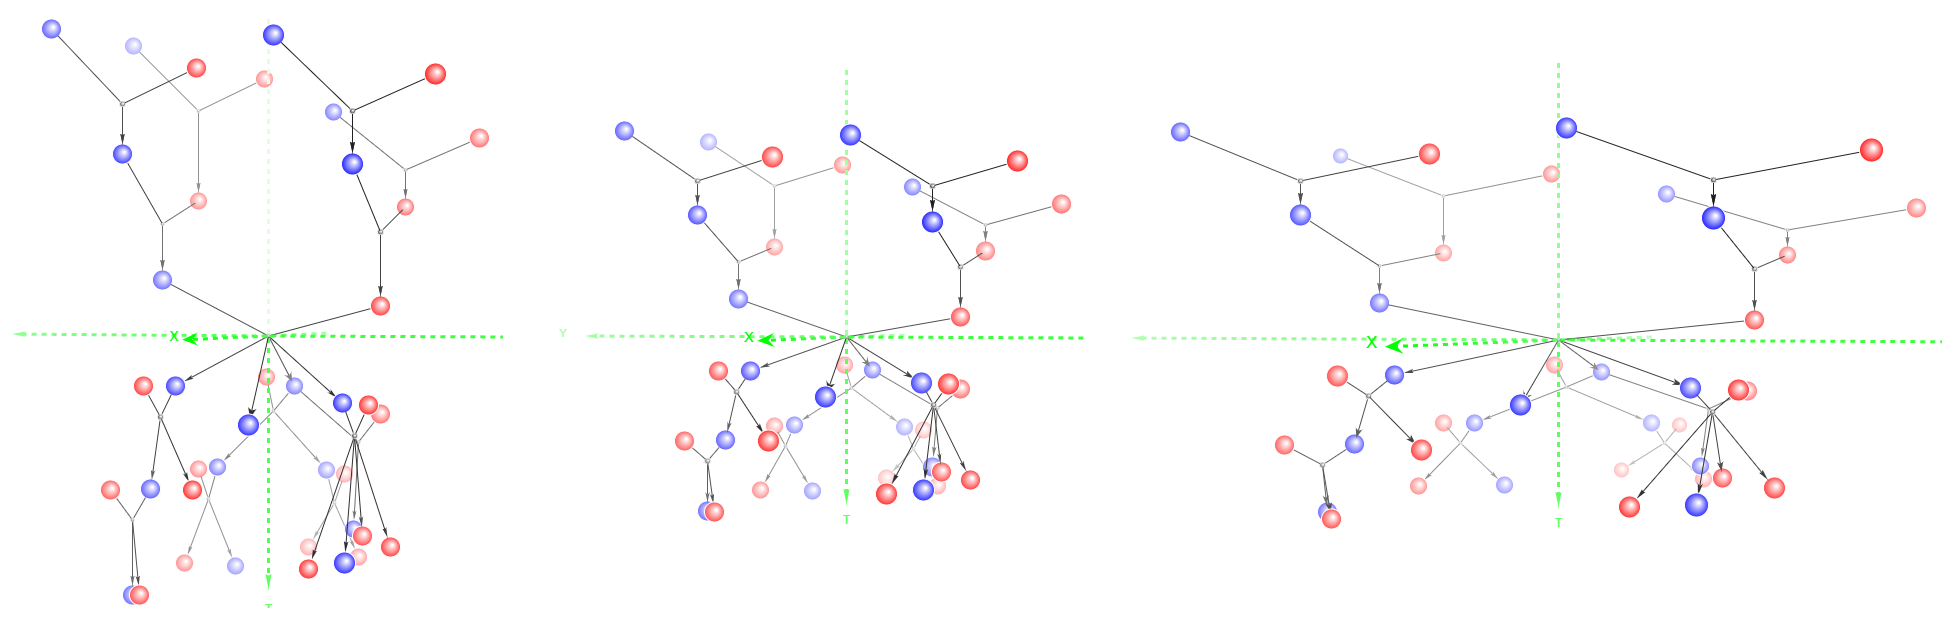
The 3 figures below represent the same tree, in the center, in a temporally dilated version (on the left) and a horizontally dilated version (on the right).
Object size
The radius of the spheres as well as the size of the images representing the objects can be reduced or increased at will. This can be obtained using the « R » and « SHIFT+R » keys on the keyboard.
- By pressing the « R » key, you decrease the radius or the size.
- By simultaneously pressing the « SHIFT » and « R » keys, you increase the radius or the size.
The font size of the texts associated with the objects can also be reduced or enlarged at will. This can be obtained using the « S » and « SHIFT+S » keys on the keyboard.
- By pressing the « S » key, you decrease the font size.
- By simultaneously pressing the « SHIFT » and « S » keys, you increase the font size.
All spheres representing the same type of object, individual or union, have the same radius and their text have the same size. However, due to perspective effects, the radii of the projection circles of the spheres on the screen are different: foreground objects have a larger actual radius and font than background objects.
The same phenomenon occurs for images. An image in the foreground appears larger than when it passes into the background.
Viewpoints take into account the radius of spheres, the size of images and the font size at the time they were created or updated.
These commands can be repeated in either direction as many times as you wish within the limits of a minimum radius equal to 1 and a maximum radius which depends on the screen.
Note: the size of the characters actually used for a given object naturally varies depending on the reference font size (set by the commands described above) and the position of the object in the tree. As it can only take discrete values (6, 8, 10, 12, etc.) and cannot fall below a limit value (texts would be illegible), it is possible that the « S » and « SHIFT+S » appear inoperative for distant objects. This means that these objects are beyond the readability threshold.
Note: When the camera is very close to the tree and / or the focal length is very high, the object radius or size increase command may become inoperative. If you are in this situation, move the camera backwards or decrease the focal length.
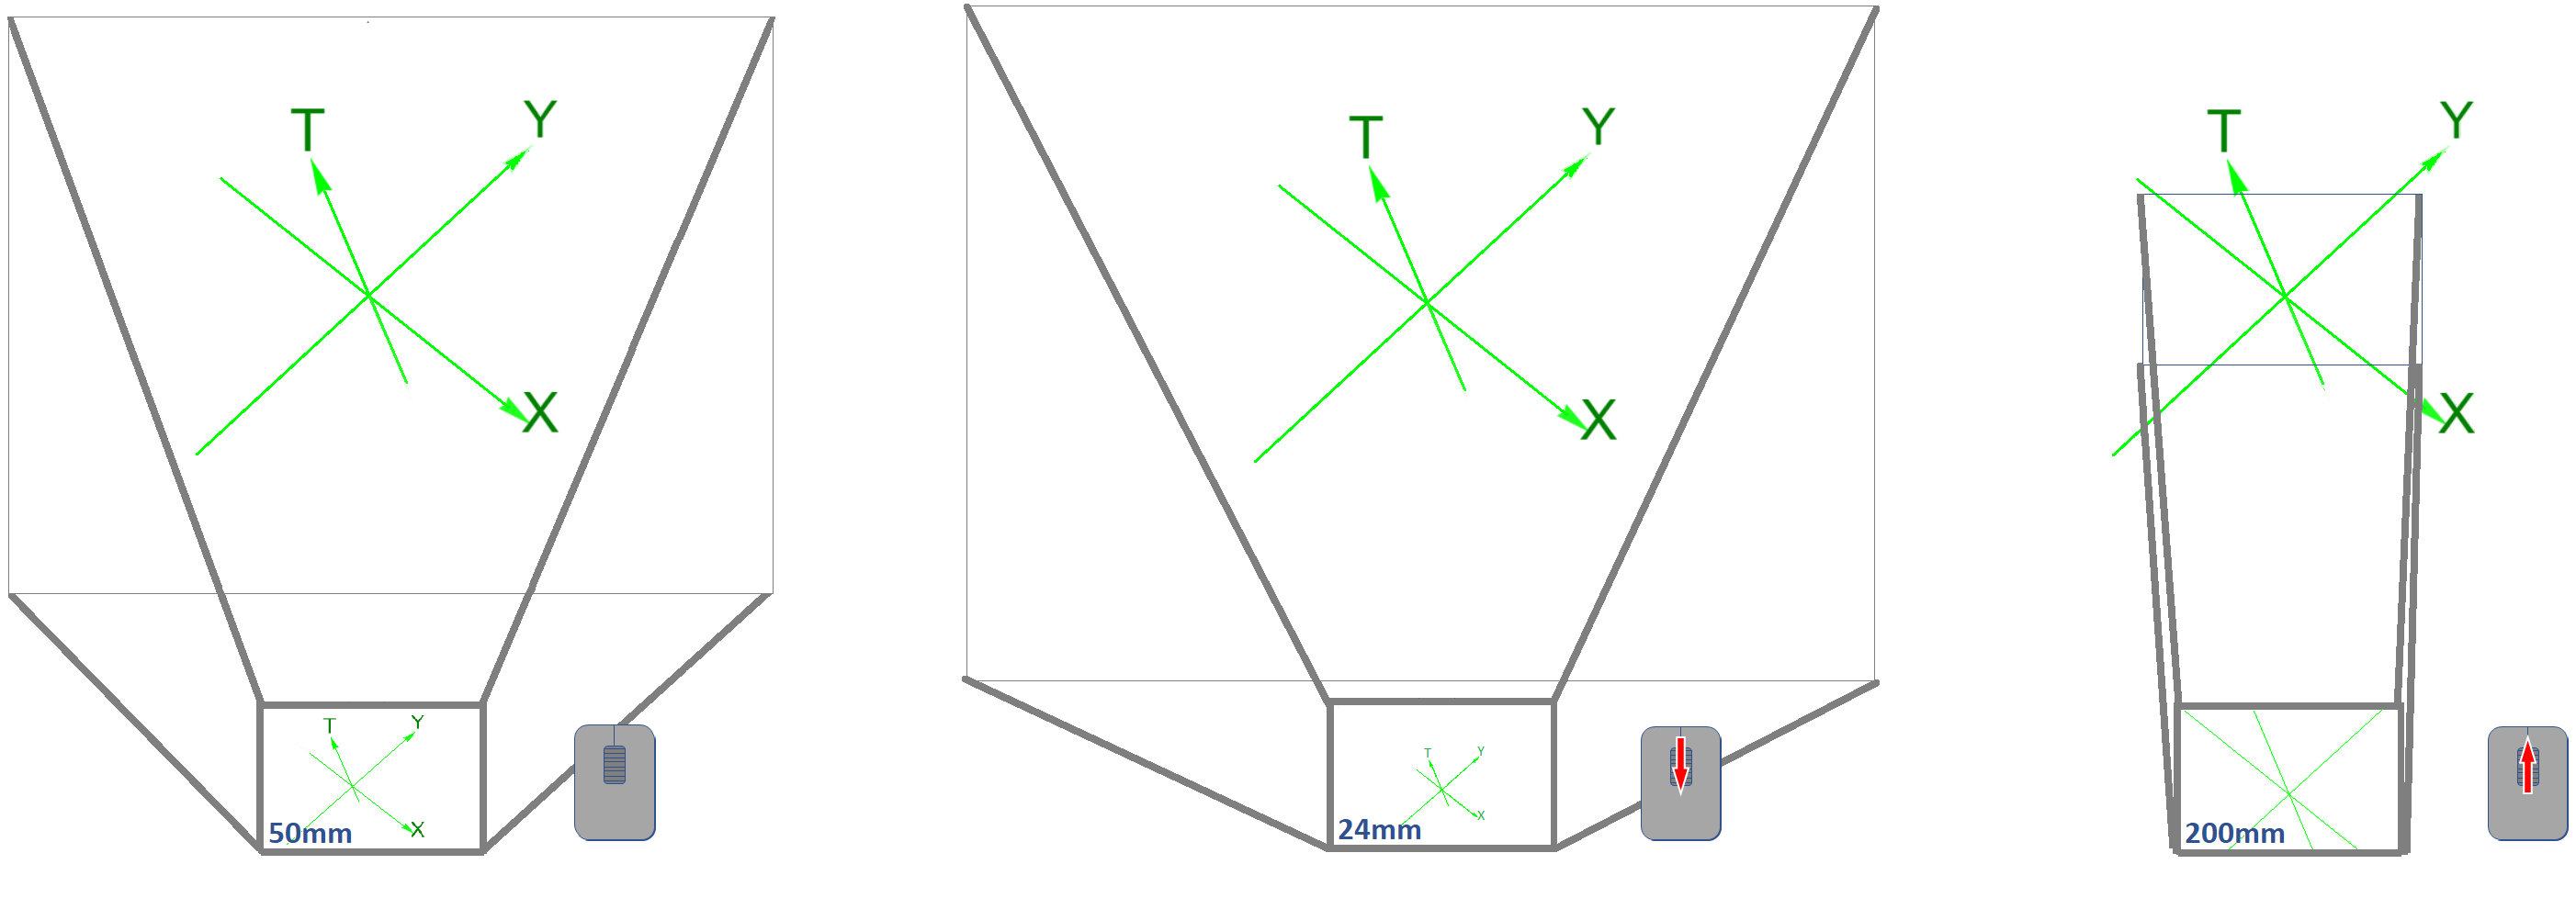
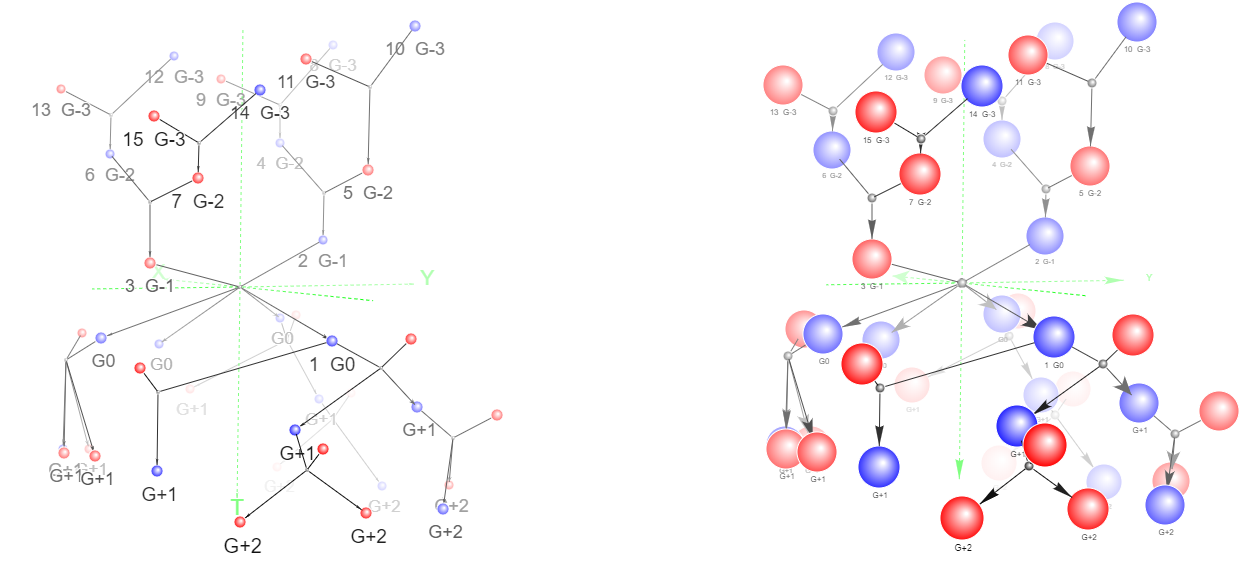
The following figure shows the same tree with increased font size and reduced radius (left) and with reduced font size and increased radius (right):
Pull an object aside
It often happens that after a movement one object masks another. Temporarily pulling aside the object in the foreground allows you to make the one in the background visible.
To pull an object aside, click in it and then move it while keeping the mouse button pressed. When you release the mouse button, the pulled aside object returns to its place.

Move objects
Objects can be moved in the tree. Their coordinates are then modified in the frame of reference linked to the tree (the green system of axes).
Moving of an object is carried out in the same way as pulling it aside but while keeping the « SHIFT » key pressed.
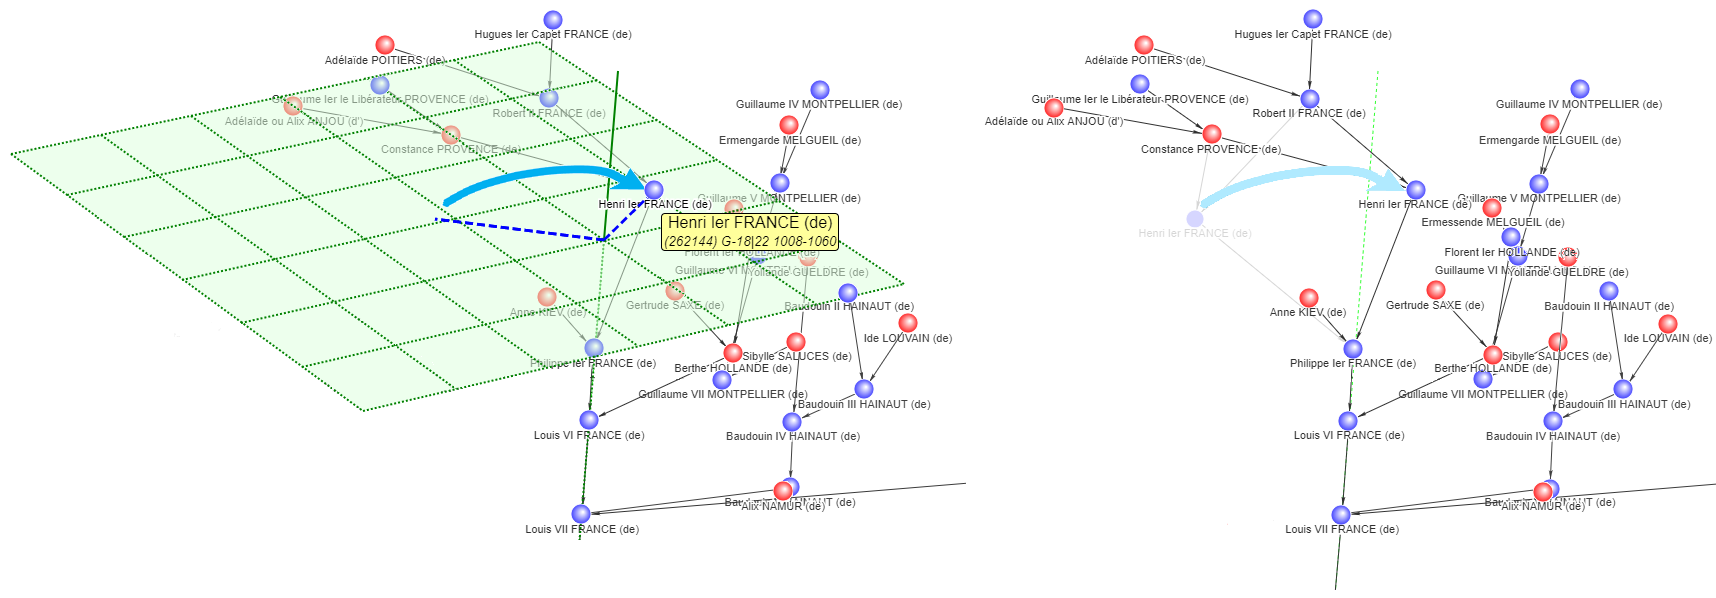
What you see on the screen is the image of the three-dimensional tree projected onto the camera's two-dimensional sensor. It is therefore the projection of the object that is in fact displaced.
All objects on the same line of sight have the same projection on the screen. Furthermore, moving individuals obviously does not change their birth date. Hence, they can only be moved in a plane perpendicular to the time axis of the tree. So, the software determines the object's new position by calculating the intersection of its new line of sight with that plane.
To facilitate this movement, a grid appears to materialize the plane of the object, a grid the origin of which is at the intersection of the plane with the time axis. Two rays starting from this origin help to visualize the old and the new position in this plane.
By simultaneously holding down the « SHIFT » and « ALT » keys, it is possible to move an entire column.
If the moved object is upstream of the tree root object (earlier date), you move the entire column of its ancestors at the same time.
Likewise, if the moved object is downstream from the root object (later date), you move the entire column of its descendants at the same time. If the spouses of the descendants or of the displaced individual are present in the tree, they are also moved with the column.
In case of implex and in order to avoid contradictory movements, the movement of a column stops at the level preceding the one where two branches meet.
Note: for better precision in movement, it is advisable to move objects when the time axis is not too inclined with respect to the Z axis of the fixed frame of reference. Otherwise, when the object's plane of evolution is seen almost from the edge, small displacements of the projection generate displacements of large amplitudes for the object. Ultimately, when the line of sight is in the plane of evolution, the object's new position is indeterminate.
Highlight a branch
Towards the root individual
It is possible to visualize the branch which connects any individual of the tree to the root individual. To do this, select an individual by clicking in it, either in the tree or in the list (see below List individuals). All the intermediate objects as well as the lines appear in bold. To deselect it: re-click in it.
For better visualization, it is advisable to suppress the display of texts ("N", "D", "K", "G" keys), only the objects appearing on the selected branch remain displayed.
In case of implexes, the shortest branch is selected. When 2 branches have the same length, the first found is selected.
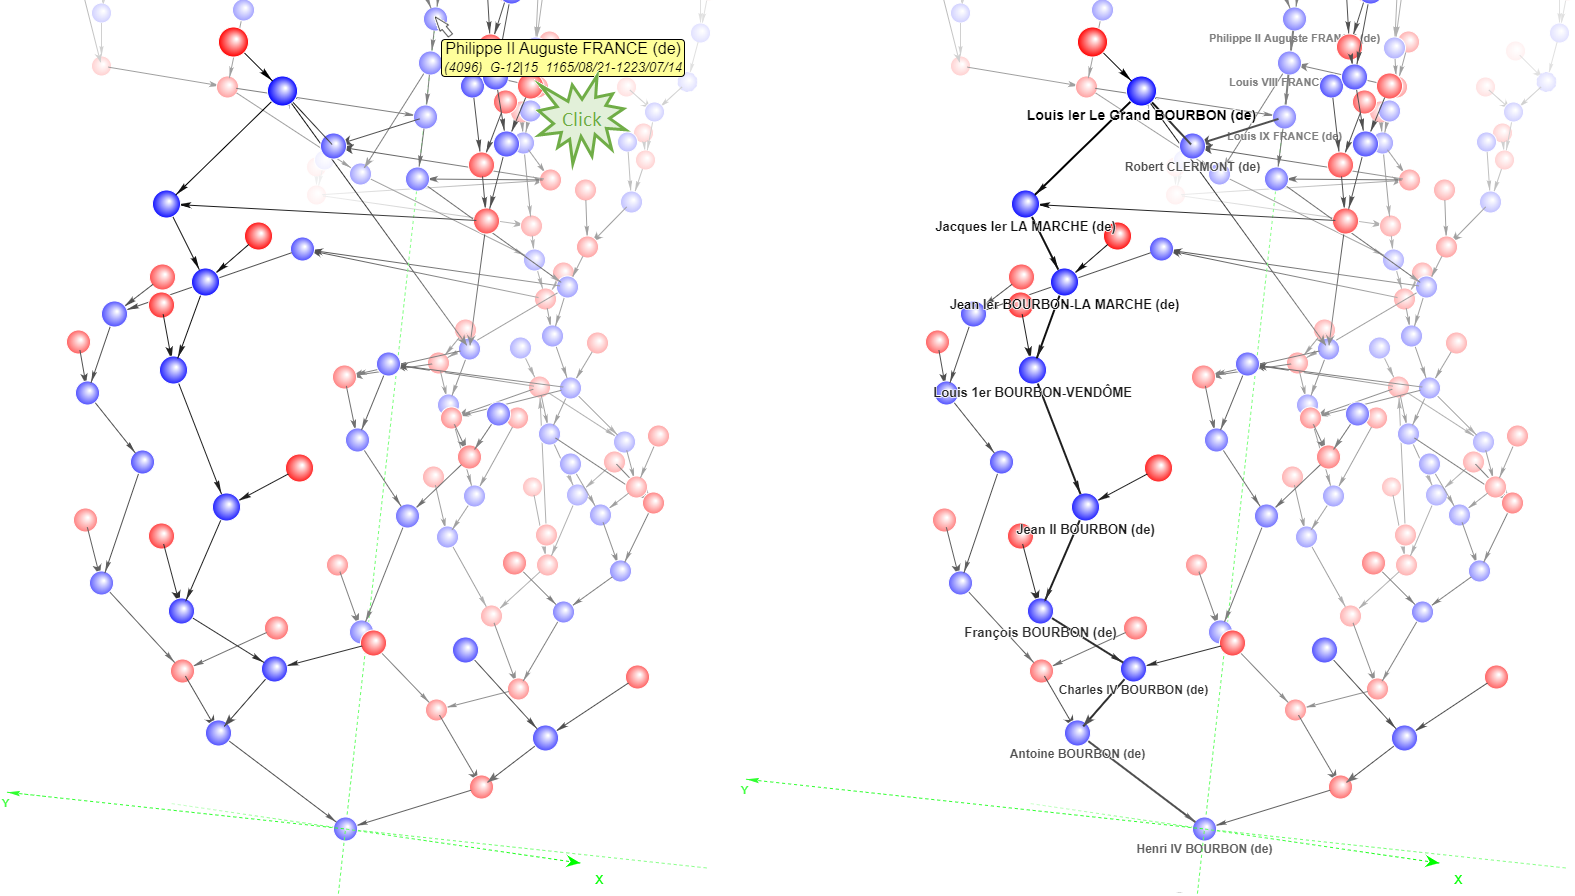
The following example shows the ancestry tree of Henry IV. Clicking on Philippe Auguste reveals the direct
branch between these two kings of France. It is in this case the patrilineal branch as is often the case although it is not a rule.
In this example, the selection of the patrilineal branch is a chance; there are in fact in the same tree other branches
of the same minimum length.
Women tend to marry younger than men, and men statistically have children later than women.
It is thus not rare to find a difference of thirty years or more between 2 children of the same father in the
event of his remarriage. The consequence of these two phenomena, combined and repeated over a long period,
is that the shortest branches are often those which have proportionately the fewest women.
In case of implexes, it is possible to visualize all the possible branches of the selected individual towards the root. To do this, hold down the « ALT » key when you click in the individual.
Between two individuals
Clicking in a second individual while keeping the « SHIFT » key pressed allows you to view the common descendant of two ascendants or the common ascendant of two descendants.
Clicking again in one or the other of the selected individuals with or without the « SHIFT » key pressed deselects it.
Clicking in a third individual deselects the second or the first depending on whether or not the « SHIFT » key is pressed.
If no individual is selected, the « SHIFT » key has no effect on the selection of a first individual.
The « SHIFT » and « ALT » keys are exclusive.
In the same ancestry tree as above, we see that Marguerite d'Angoulême is a common descendant to the 5th generation of Bonne de Luxembourg and Bonne de Valois although the latter is herself a granddaughter of the former!
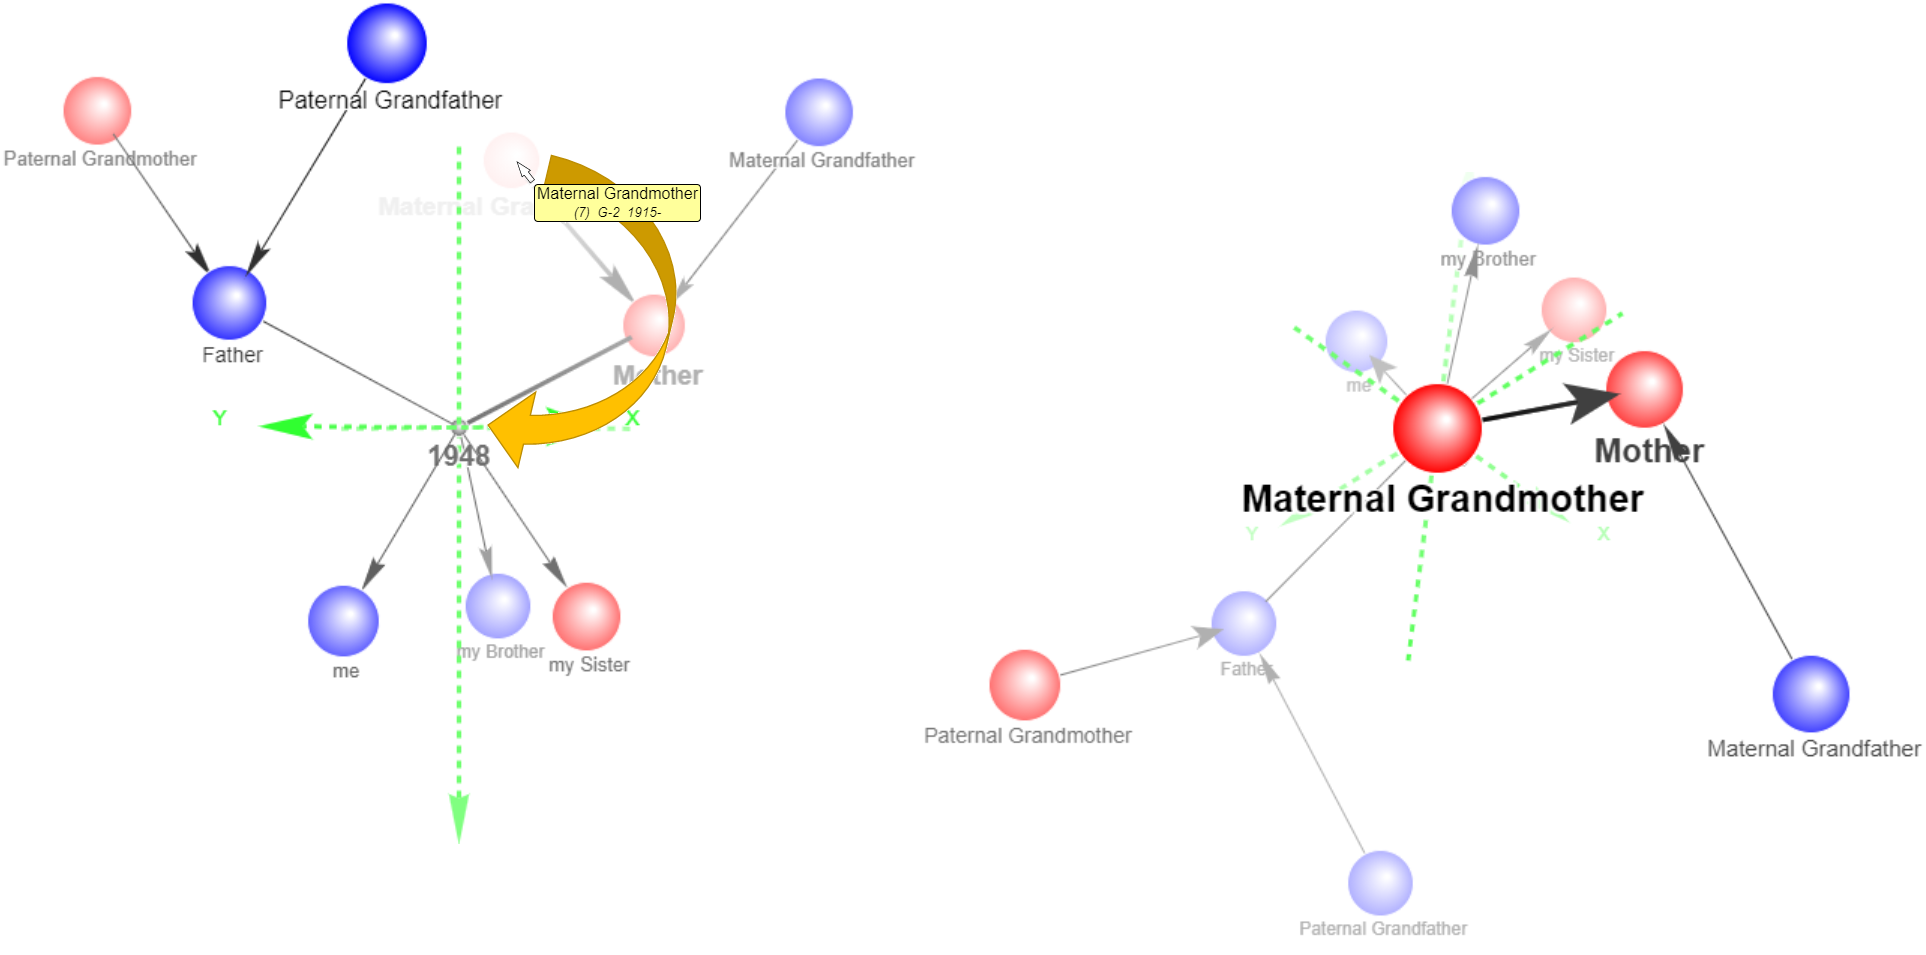
Align an object
This command allows you to easily locate the last selected individual by automatically placing it in the main line of sight.
The main line of sight is the line which joins the center of the camera sensor to the root (i.e. the origin of the axis systems materialized on the screen by the intersection of the green dotted lines).
To align the last selected individual on the main line of sight, press the « A » key on the keyboard or choose the « Auto alignment » option from the list (see List individuals below). The tree rotates automatically without changing the camera focal length or position (unless the origin was not visible, in which case the camera is automatically moved to bring it back into the field).
It is possible that the individual, although aligned with the main line of sight, is masked by another located in the foreground. In this case, you can pull aside the latter (see above Pull an object aside).
List individuals
This function is used to display in a floating window the list of individuals actually present in the tree.
The list is activated by pressing the « L » key on the keyboard or by checking the « Display individuals list » box in the settings window (see Settings above). When the list is active, pressing again the « L » key deactivates it.
The list activates where it was previously deactivated, by default at the top left of the screen. Like all explicitly set options, the position of this list at the beginning of a new session is the one it had when the settings window was last validated.
Like all the other windows, the list of individuals can be moved around but unlike the first ones it does not neutralize the commands in the tree or in the control panel. On the other hand, it is neutralized by opening one of these other windows.
The list is presented in a form similar to that used during generation with the difference that it is restricted to the individuals actually present in the tree. It can be sorted according to the same criteria and filtered in the same way (see Generate above).
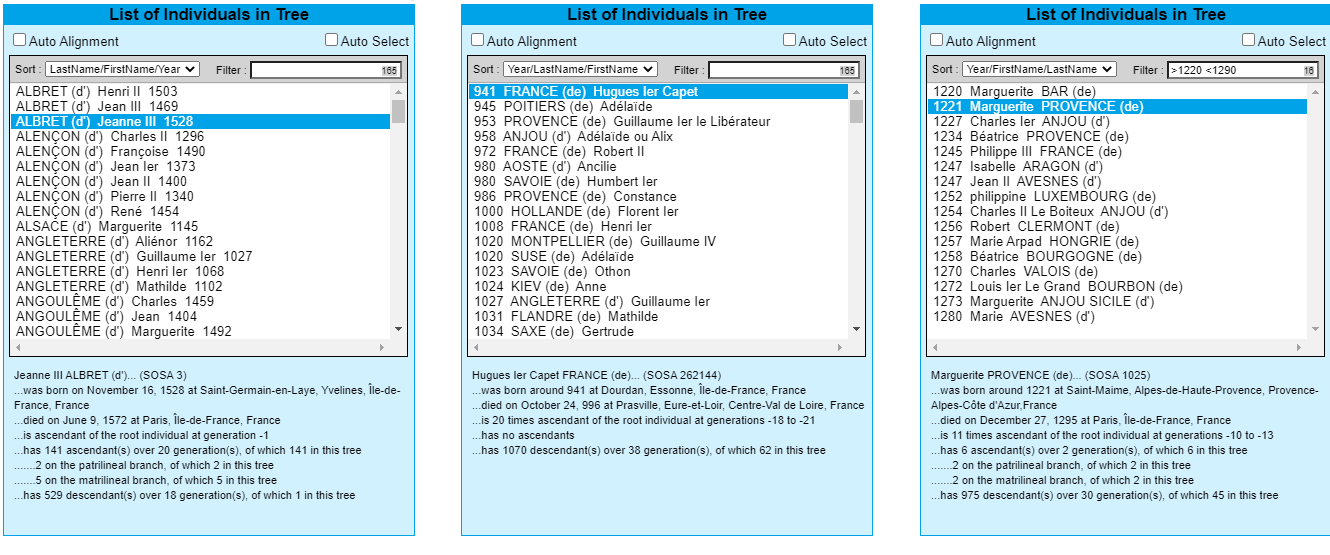
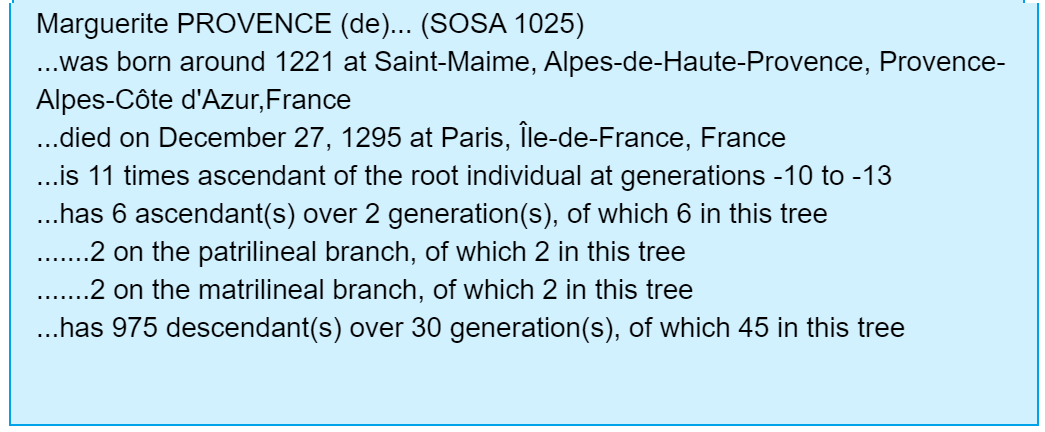
The lower part of the window details the characteristics of the current individual in the list:
- First and last name
- SOSA number (for ascendants)
- Date and place of birth
- Date and place of death
- Number of times the individual is ascendant or descendant from the root individual
- Relative generation number(s)
- Total number of known ascendants in the initial GEDCOM file
- Number of ascendants actually present in the tree
- Total number of ascendants known on the patrilineal branch
- Number of ascendants on the patrilineal branch actually present in the tree
- Total number of ascendants known on the matrilineal branch
- Number of ascendants on the matrilineal branch actually present in the tree
- Total number of known descendants in the initial GEDCOM file
- Number of descendants actually present in the tree
The upper part of the window contains two check boxes.

Auto alignment
When this box is checked, the individual current in the list is automatically aligned on the main line of sight (see Align an object above).
Auto select
When this box is checked, the individual current in the list is automatically selected in the tree and its shortest
branch to the origin is highlighted.
Selecting it again unhighlights this branch. (see above Highlight a branch).
If the individual has been made current in the list with the « SHIFT » key pressed, it is considered as the second
individual if there is already one selected.
When the list is active and an individual is selected in the tree, it is automatically made current in the list,
whether the box is checked or not.
Mask / Unmask individuals
Mask
It can be interesting to hide some individuals or certain branches to emphasize others, for example in a viewpoint.
To mask an individual, select it, in the tree or in the list with the « Auto select » option. The branch connecting it to the root individual is highlighted. Then press the « M » key on the keyboard: the individual disappears as well as all its ascendants if it is itself an ascendant of the root individual or all its descendants if it is itself a descendant.
When two individuals are selected (see above Highlight a branch) the masking function is disabled: first deselect one.
The root individual cannot be masked (which would make the whole tree disappear!).
In case of implexes, only those ascendants or descendants who cannot be reached by another unmasked branch are also masked.
When the masked individual is a descendant of the root individual, the possible spouses of this individual and of its descendants are also masked (unless they are themselves descendants of the root individual and accessible by an unmasked branch).
The list of individuals present in the tree is updated accordingly: all individuals directly or indirectly masked disappear.
The states masked or not of individuals are part of the « viewpoints » and are recorded with them (see above Control Panel).
Show masked individuals
It is possible to reveal all the masked individuals, for example to be able to unmask them. To do this, simultaneously press the « SHIFT + M » keys or choose the « Display Masked Individuals » option in the settings window (see Settings above).
All the masked individuals then appear in gray. Those who have been explicitly masked are indicated by the presence of a slash on their sphere or their image. The hidden individuals also reappear in the list. They are grayed and right shifted. Those that were directly masked also have a slash and are of a deeper gray.
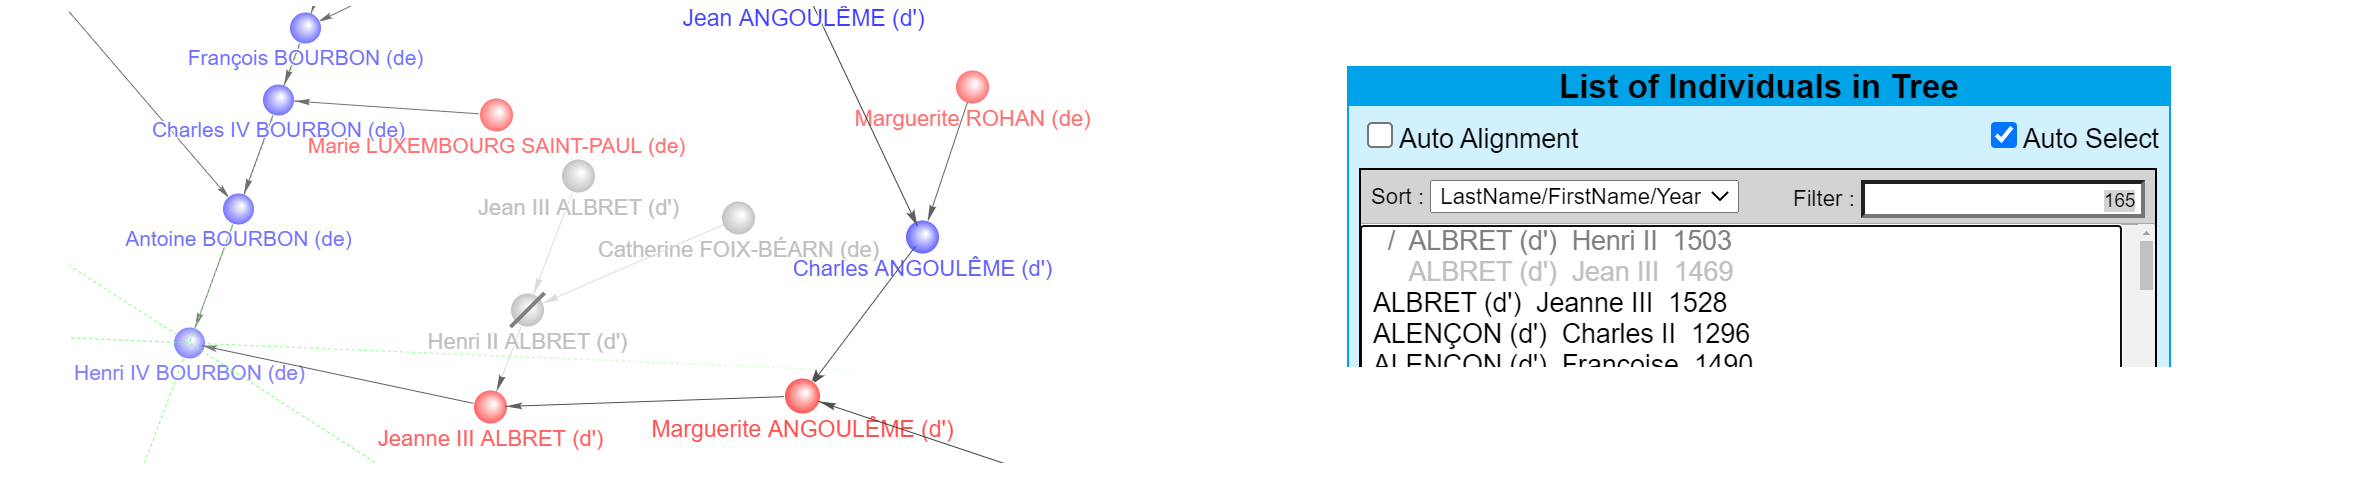
The « SHIFT + M » command works in toggle mode. A new press remasks all masked individuals.
It is possible to make hidden individuals appear only in the list without them being visible in the tree by typing « * » in the filter zone at the top right of the list.
Unmasking a masked individual
Show all the hidden individuals (SHIFT + M in the tree or * in the list) then select the one to unmask (which appears crossed out with a slash) and press the « M » key again: the individual reappears (or is no longer crossed out). It reappears only if it has at least one branch towards the root which does not include any other masked individual closer to the root than itself; otherwise, it remains indirectly masked (it remains grayed out but is no longer crossed out).
All the individuals who were indirectly masked by the masking of this individual also reappear, unless there is another masked individual on the branch between them and the unmasked individual.
Unmask all masked individuals
Simultaneous pressing of the « ALT+M » keys enables all the hidden individuals to be unmasked in a single command without having to display them or to select one.
Film
Warning. This feature is only available with Chrome (Win and Mac), FireFox (Win and Mac) and Edge (Win) browsers.
The « Film… » menu allows you to record a video of the tree present on the screen performing a complete rotation. The rotation takes place around the vertical axis or the time axis depending on the configuration you have chosen (see Control Panel above).
All options for displaying and masking objects active at the time of recording are taken into account, as well as the period selected and the automatic adjustment to the screen (Auto Fit to screen).
Recording takes place in the background. The list (see supra List individuals above) that may be present will not appear in the video.
At the end of the generation process, the video comes as a standard .mp4 file in FullHD (1920x1080) format at 30 frames per second and approximately 45 to 90 seconds in length.
The build process is computationally intensive. In order to ensure the maximum fluidity of the generated video, it is strongly recommended to close all other applications as well as all other tabs of the browser.
The whole process can take up to twenty minutes depending on the complexity of the tree.
Calibration
The captured scene is exactly the same as the one you have on the screen which is then adapted to conform to the FullHD format.
The latter having an aspect ratio of 16:9 or 1.77, you must ensure that the drawing area has an equivalent aspect ratio in order to avoid image distortions at generation time. To do this, simply resize the browser window. This briefly displays the drawing area dimensions and their ratio. Then vary the width, or height, of the browser window until this ratio is close to 1.77 (between 1.70 and 1.90).
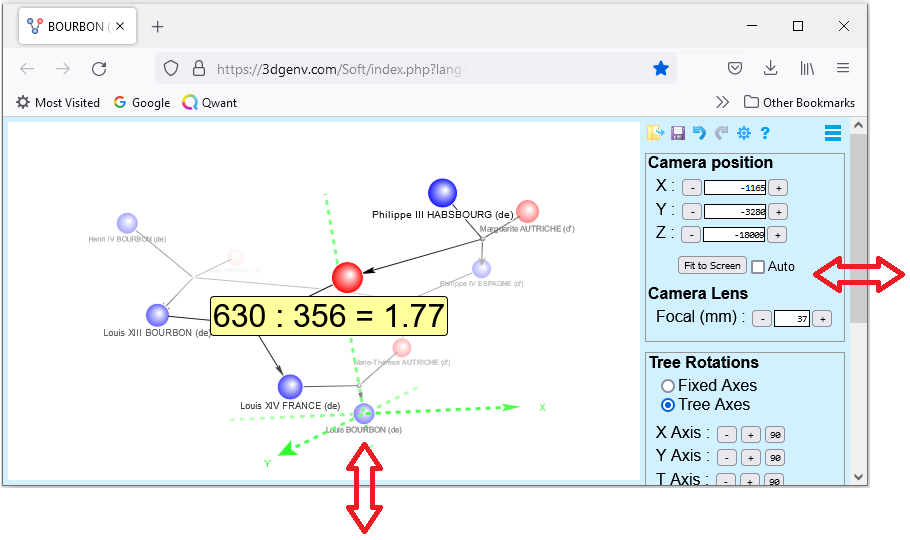
The exact dimensions do not matter, only the width/height ratio matters. Most computers have a 16:9 screen whether it is HD, FHD, QHD or UHD. So, a simple way to obtain a ratio close to 1.77 is then to switch the browser window to full screen mode (often the « F11 » key on the keyboard) and to turn off the display of the control panel (« P » key ).
Once this adjustment is made, perform a complete rotation of the tree to ensure that at any time it does not overflow the screen. If necessary, adjust the position or the focal length of the camera (unless you have chosen the “Auto Fit to screen” option).
Enregistrement
When you call the « Film… » menu, the window that appears indicates the current aspect ratio of the drawing area.

If it is displayed in red, you are at risk of distortion. Close the window and return to the previous point (Calibration). Otherwise, you can trigger the recording.
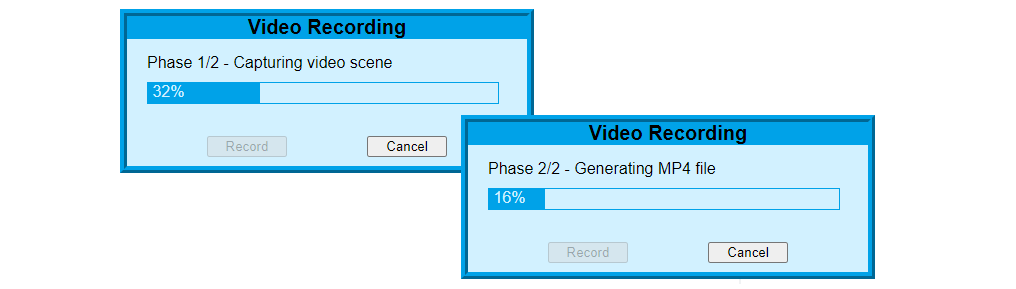
Recording is performed in two phases.
The first phase consists of capturing the scene. The tree performs a complete rotation (360°) around the axis you have chosen. All current display settings are taken into account.
This process lasts about ten minutes and takes place entirely in memory, nothing happens on the screen. In order to avoid jolts in the generated video, it is strongly advised not to intervene during this phase and to let the computer work having previously closed all other applications as well as all other tabs of the browser.
The second phase consists of the actual .mp4 file generation from the captured scene.
This phase takes place on the server. Its duration, from one to three minutes, depends on the speed of your internet connection.
At the end of this phase the .mp4 file is downloaded. As with the generated .3dgenv files, this download is automatic or manual depending on your browser settings.
The default name of the .mp4 file is the same, except for the extension, as the .3dgenv file that contains the tree.
The size of the .mp4 file varies from 5 MB to 50 MB depending on the number of individuals in the tree. It can threfore be sent by e-mail or placed on a shared directory in the Cloud.
If your media player allows loop playback, you can get a continuous rotation of the tree like in the example below which illustrates a video recorded with the auto-fit to screen option.
Photos
Reminder: pressing the "I" key displays the tree with for each individual its associated photo (see Settings above).
Photos Assignment
The « Photos… » menu allows you to assign a photo or any image to each of the individuals present in the .3dgenv file currently open.
If there is no associated photo, the following images are assigned by default.

When you have finished assigning your photos, don't forget to save your changes (« Save » menu).
Only images or photos with the extensions .jpeg, .jpg .png can be associated with individuals.

The left part of the assignment window presents the list of all the individuals contained in the file (those cited in the original GEDCOM) or only those present in the tree. The radio buttons at the top of the list allow you to make this choice.

Lists can be sorted and filtered like during generation (see Generate above) or like in the List window (see List individuals above).
The right part of the window recalls the individual selected in the list and allows you to associate a photo with him or her. This photo can be referenced or embedded depending on the radio button chosen.

Embed a photo
Embedded photos are included, after possible reduction in size, in the .3dgenv file.
Press the "File" button and select the photo you want to associate to the individual.
Embedding is the easiest photo assignment method. However, the inclusion of photos, even reduced in size, in the .3dgenv file considerably increases the size of the latter which can reach several megabytes. Moreover, any subsequent modification of the photo on your computer requires, in order to be taken into account, that the photo is re-embedded.
Reference a photo
Referencing a photo eliminates these two drawbacks: the .3dgenv file remains compact and any subsequent modification the photo is automatically taken into account the next time the file is opened (after a possible removal of caches, depending on your browser settings).
The reference to a photo is a valid internet address for this photo. It can be:
-
An image located on a public site.
e.g. https://upload.wikimedia.org/wikipedia/commons/thumb/f/f5/Louis_XIII_%28de_Champaigne%29.jpg/220px-Louis_XIII_%28de_Champaigne%29.jpg -
An image located on a private site.
e.g. https://mySite.com/Photos/Family/Dean_Martin.jpg -
An image located on your local server.
e.g. http://localhost/Photos/Family/Paul_Martin.jpg
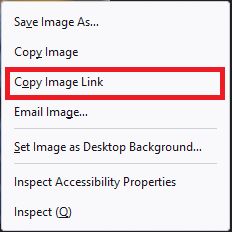
Open a new tab in your browser and navigate to the chosen image, then right-click in the image and copy the image address.
Then go back to the 3DGenV tab and paste this address in the "Photo" field. The image appears below this field.
REMARK : It should be the address of the photo and not that of a page containing the photo.
The fact that the photo appears in its original site does not guarantee that it can be displayed from another site, 3DGenV.com in this case. It depends on the access policy adopted by the operator of the original site.
An image is a list of pixels themselves made up of 4 bytes representing their red, green and blue components
as well as their transparency.
It can also be seen as a list of random bytes that could contain anything, including malicious code.
This is why the browser distinguishes the display of pixels, a risk-free operation,
from the manipulation of the bytes that compose them, which is potentially more at risk.
Encoding and compression algorithms used when generating photos or videos require byte manipulation.
The generation of a video or a photo for a given tree will therefore only be possible
if a relationship of trust is established between the site that provides the images and the one that uses them.
This is the purpose of the "Access-Control-Allow-Origin" declaration by which the image supplier
site authorizes such other site, possibly all, to manipulate them.
|
Case N°1 The source site prohibits access to its content from third party sites. In this case the image on the right is displayed. |

|
|
|
Case N°2 The source site allows access but not manipulation of its content from third-party sites. In this case the image is displayed with a red dot at the top-left corner. It will be displayed in the tree but cannot be included in a video or photo. It will then be replaced by the corresponding default image. |

|
|
|
Case N°3 The source site allows access and manipulation of its content from third-party sites. In this case the image is displayed with a green dot at the top-left corner. |

|
Some tips
To obtain a homogeneous tree, it is advisable to use photos having the same proportions, ideally a square format, and in which the individuals occupy roughly the same surface.
In the following series, only the first three images are consistent.
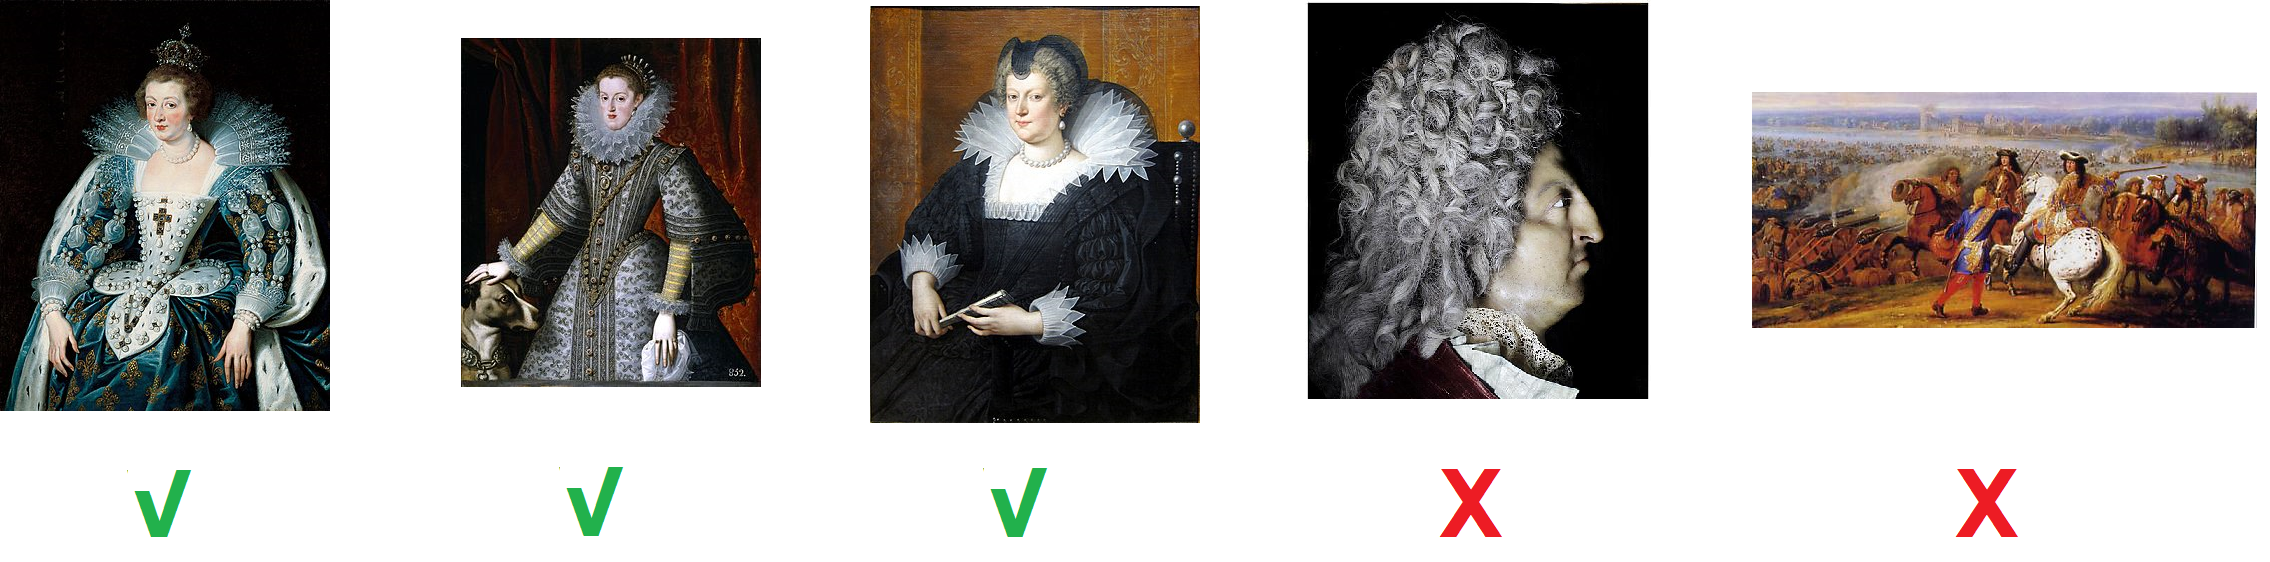
The actual size of the photos is of no importance, only the width/height ratio counts. It should be approximately the same for all pictures.
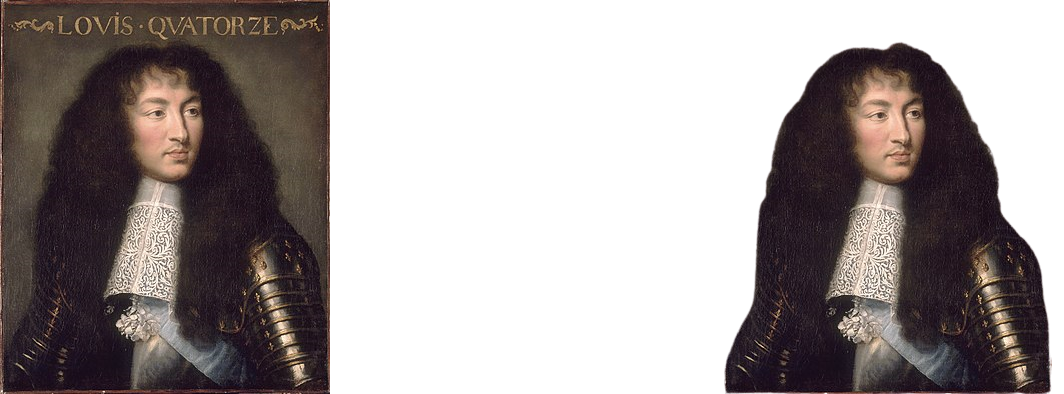
The best results are obtained with cutout photos (the individual on a transparent background). There are many software as well as free sites to cutout photos (for instance: https://www.remove.bg)
Localhost
If you have a lot of photos to assign, using a local server (localhost) is a good option. It allows you to reference photos located on your computer rather than embedding them. It keeps .3dgenv files compact and allows post editing of photos without the need to re-reference them.
You will find many tutorials on the web to install a local server, but if you are on Windows, the easiest way is to activate the one that is provided as standard (IIS).
Go to "Settings -> Applications & Features". In Windows 10: activate "Internet Information Services". In Windows 11: click "Turn Windows features on or off" and check the box to the left of "Internet Information Services".
In both cases, once the installation is complete, launch the file explorer.
The "inetpub" directory was created at the root of the disk with subdirectories including wwwroot.
Unfold it and create a "Photos" directory (you must have administration rights).
It is in this directory, or its sub-directories, that you will deposit your photos.

All that remains is to authorize 3DGenV to use your photos. To do this, launch the Internet Services Manager by typing "IIS"
in the search tool. Go to the "Photos" directory and double click on "HTTP Response Headers".

Click "Add" and, in the window that appears, enter "Access-Control-Allow-Origin" and "https://3DGenV.com"
in the proposed fields then click "ok".

Voilà! you can now reference photos from your computer. Their address will be as follows: http://localhost/Photos/Jean_Martin.jpeg.
Engrave
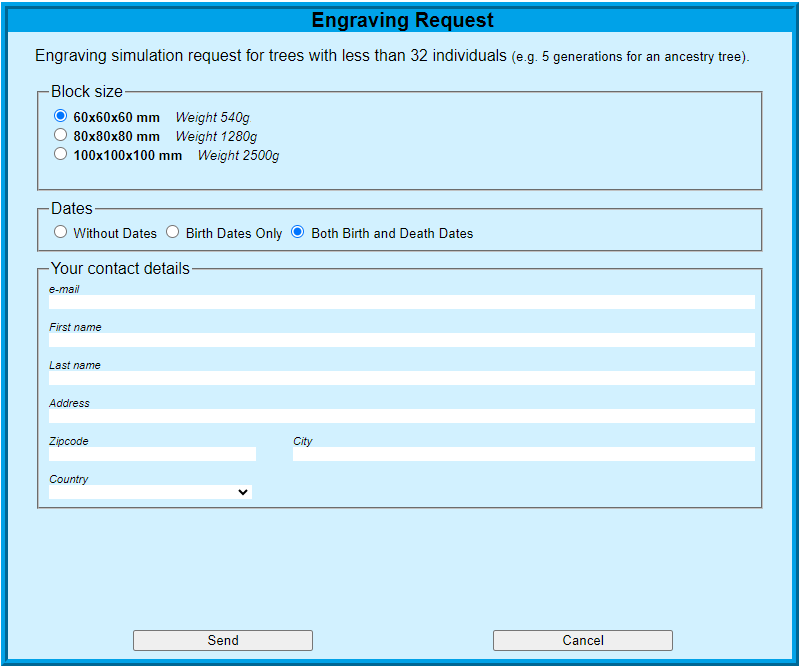
This command allows you to request a simulation before ordering the engraving of your tree in a glass block.
It only concerns three standard block formats.
For an obvious reason of readability, the maximum number of individuals that can be engraved depends on the size of the block.
If you would like to engrave a larger tree, send us your ".3dgenv" file and we will make you a quote for a non-standard, larger block.
The size of the font used during engraving depends, for each block, on the length of the longest name (first first name and last name). The simulation takes this particularity into account.
You indicate the type of block chosen:
- Size 60x60x60 mm, Weight 540g, maximum of 7 people over 3 generations
- Size 80x80x80 mm, Weight 1280g, maximum of 15 people over 4 generations
- Size 100x100x100 mm, Weight 2500g, maximum of 31 people over 5 generations
...as well as the date format:
- Birth dates only DD-MM-YYYY (recommended for birth gifts)
- Classic dates: Birth-Death YYYY-YYYY
- Without the dates
You will receive within a few days a video simulation of your block as well as a pro-forma invoice and a secure link for the payment.
If the simulation suits you and upon receipt of your payment, we will register your block into the manufacturing schedule (allow 10-15 days).
PLEASE NOTE - We only deliver to mainland France and to other countries of the European Union.
Undo / Redo
As in most applications, you can undo or redo an action or a series of actions.
Undo
Simultaneously press the « Ctrl+Z » keys or click the « Undo » icon in the menu bar of the control panel. The tree reverts to the configuration it had before the canceled command.
You can only undo the last 100 performed commands.
Redo
Simultaneously press the « Ctrl+Y » keys or click the « Redo » icon in the menu bar of the control panel. The tree reverts to the configuration it had after the restored command.
To undo or redo multiple actions, repeat the operation until the tree returns to the desired appearance.
Any new action definitely deletes the canceled and not reinstated commands.
List of actions that can be canceled and reinstated:
- Discrete or continuous translation of the camera
- Changing the camera focal length
- Fit to screen
- Permanent fit to screen
- Change of the axis system for rotations
- Discrete or continuous rotation of the tree
- Minimum rotation angles change
- Viewpoint creation, modification, deletion or selection
- Period change
- Time extension or contraction
- Horizontal extension or contraction
- Increase or decrease objects radius
- Increase or decrease font size
- Moving an object
- Moving a column
- Aligning an object with the main line of sight
- Mask or unmask an individual
- Unmask all masked individuals
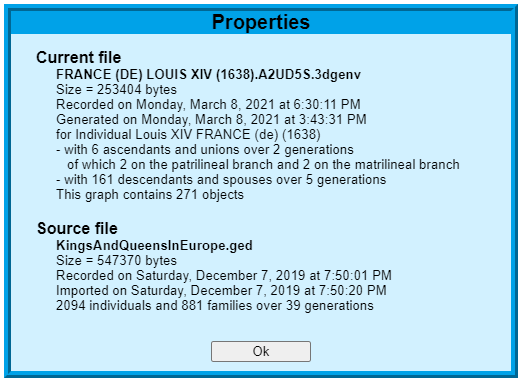
Properties
This menu gives access to information relating to the tree displayed on the screen.
Current file, the one that contains the displayed tree:
- Its name
- Its size
- Its date of last recording
- Its generation request date
- The individual or family originating the tree
- The configuration of the generation
- The total number of objects (individuals and unions)
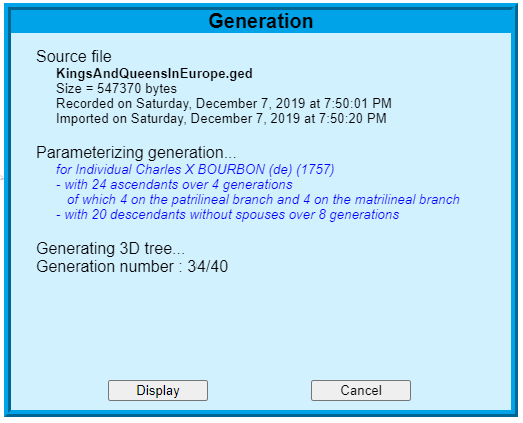
Source file, the original GEDCOM file:
- Its name
- Its size
- Its date of last recording
- The date it was imported
- The number of individuals and families it contains
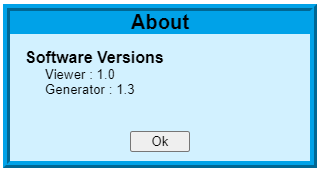
About
This menu displays version information for the generator and the viewer.
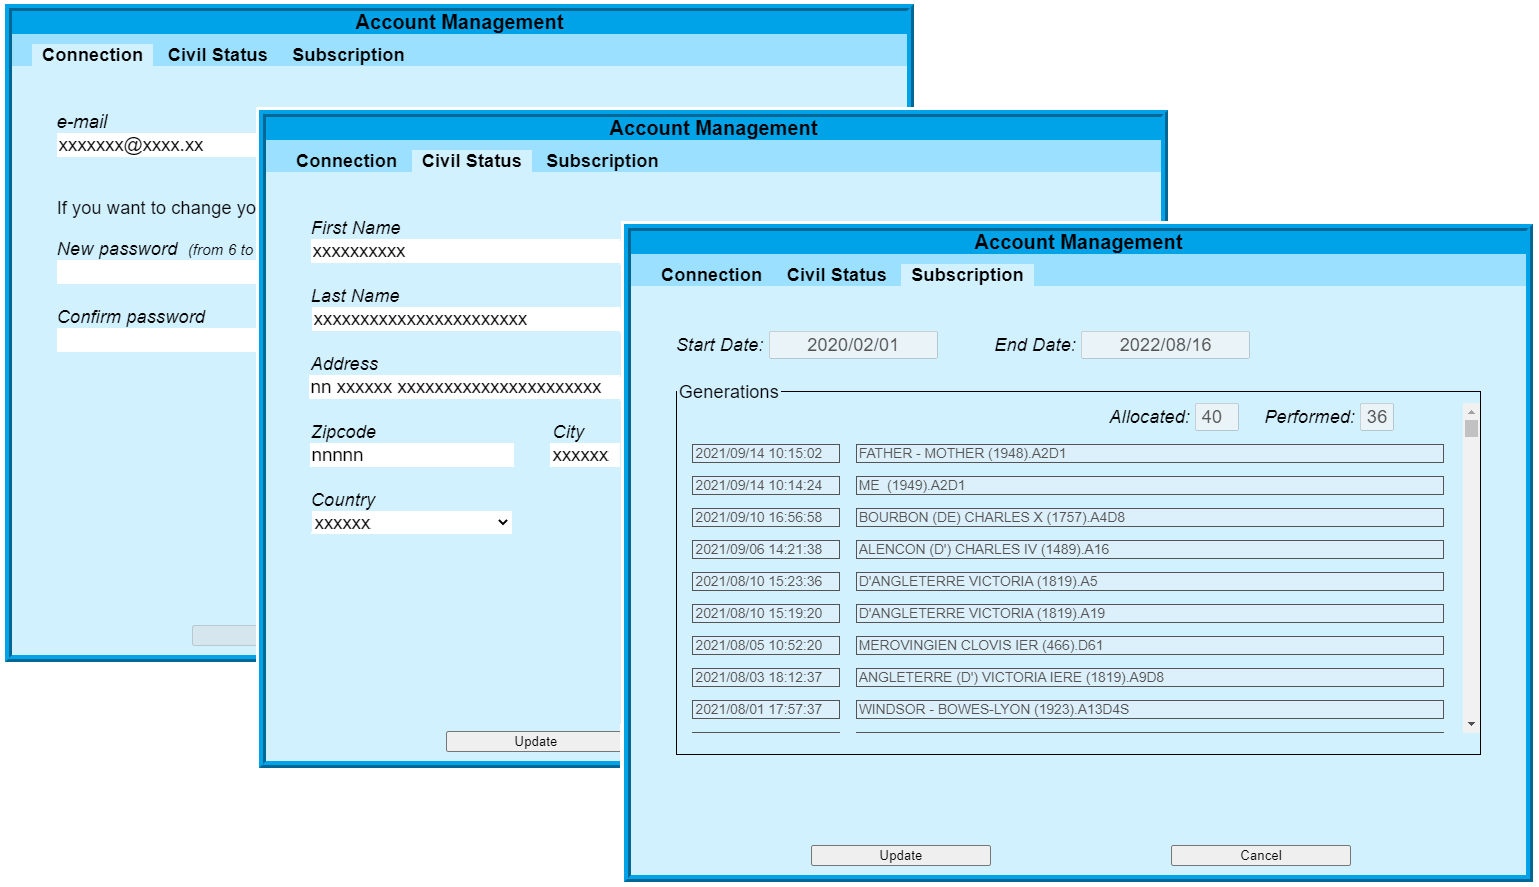
My Account
The « My Account… » menu allows you to modify your e-mail address, your password as well as information relating to your civil status.
It also allows you to view the start and end dates of your subscription, the number of generations allocated and performed as well as the list of these generations with, for each of them, the date and time of its request and the name of the file as proposed to you. The list is sorted in reverse date order: most recent generations first.
Disconnect
This command ends the current session and returns you to the login page.
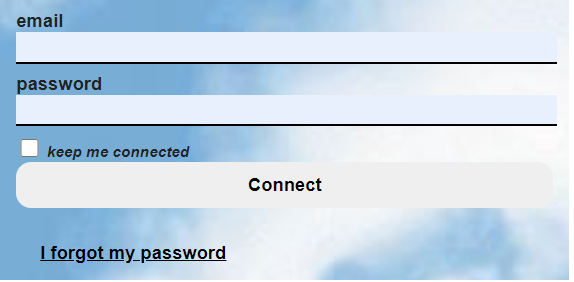
The « keep me connected » checkbox allows you to be recognized automatically when you open the app. You can then quit it simply by closing the tab or the browser. This recognition is only effective if you have accepted cookies and will remain so until you explicitly disconnect. It is obviously not recommended to use this option if you are connecting from a public space.
Finally, if you have forgotten your password, we will send you a link valid for one hour allowing you to choose a new one.